AWS CloudFormation Project
This project involves deploying a dynamic web application as Infrastructure as Code (IaC) using AWS CloudFormation and a LAMP stack. We will build CloudFormation templates, and we will create stacks for AWS services such as: VPC (public and private subnets in two different availability zones), NAT Gateway, RDS, Application Load Balancer (ALB), Auto Scaling Group (ASG), and Route 53.
Project Code on GitHub: CloudFormation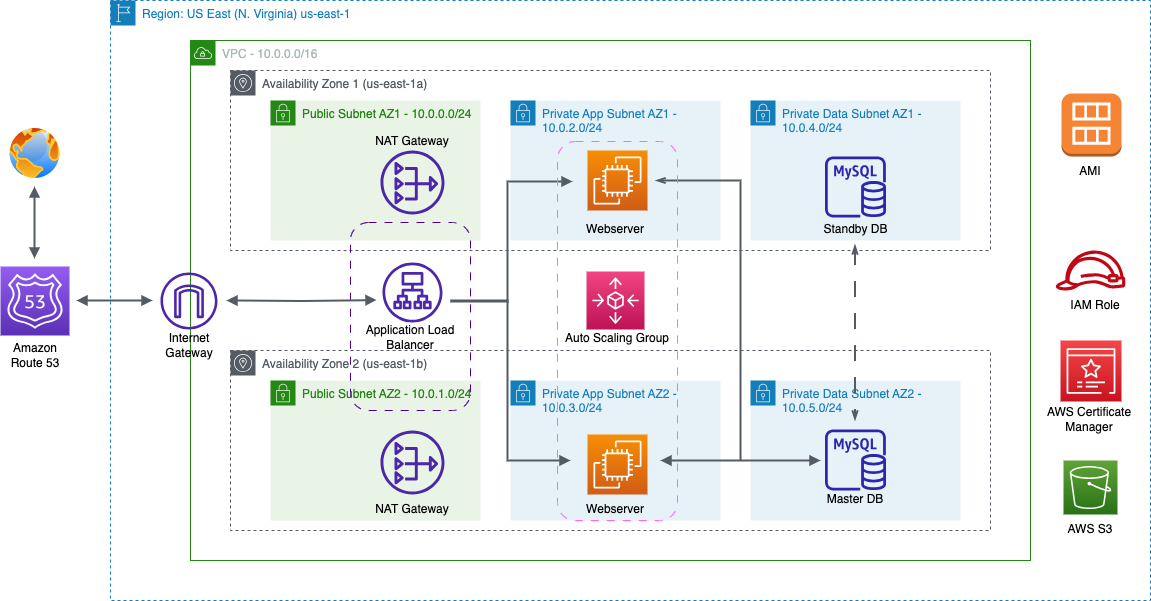
Step 1: Create VPC with Public and Private Subnets
In this step, we will create our VPC by using CloudFormation. The syntax of our code will be YAML.VPC Template
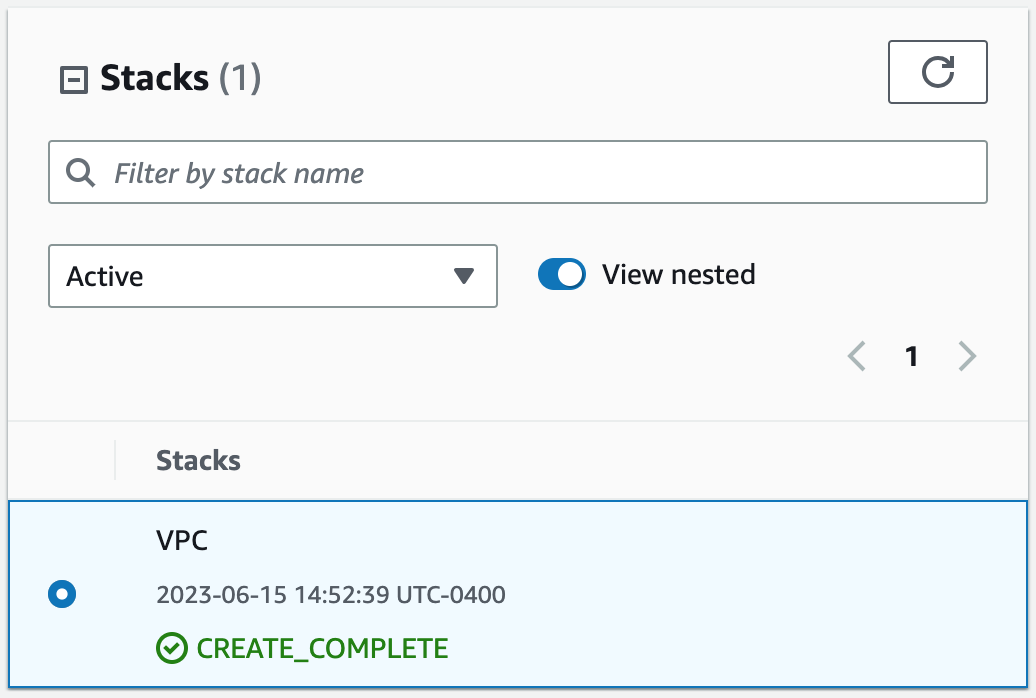
1. Upload our code to AWS CloudFormation.
- AWSTemplateFormatVersion
- Description
- Metadata
- Parameters
AWSTemplateFormatVersion: 2010-09-09

Description:
  This template creates a VPC with public and private subnets.

# The following metadata is used to group the parameters
Metadata:
  AWS::CloudFormation::Interface:
    ParameterGroups:
      -
        Label:
          default: "VPC CIDR"
        Parameters:
          - VpcCIDR
      -
        Label:
          default: "Subnet CIDR"
        Parameters:
          - PublicSubnet1CIDR
          - PublicSubnet2CIDR
          - PrivateAppSubnet1CIDR
          - PrivateAppSubnet2CIDR
          - PrivateDataSubnet1CIDR
          - PrivateDataSubnet2CIDR
      -
        Label:
          default: "SSH CIDR"
        Parameters:
          - SSHLocation

# Parameters are used to to build flexible CloudFormation templates
Parameters:
  VpcCIDR:
    Default: 10.0.0.0/16
    Description: Please enter the IP range (CIDR notation) for this VPC.
    Type: String

  PublicSubnet1CIDR:
    Default: 10.0.0.0/24
    Description: Please enter the IP range (CIDR notation) for public subnet 1.
    Type: String

  PublicSubnet2CIDR:
    Default: 10.0.1.0/24
    Description: Please enter the IP range (CIDR notation) for public subnet 2.
    Type: String

  PrivateAppSubnet1CIDR:
    Default: 10.0.2.0/24
    Description: Please enter the IP range (CIDR notation) for private app subnet 1.
    Type: String

  PrivateAppSubnet2CIDR:
    Default: 10.0.3.0/24
    Description: Please enter the IP range (CIDR notation) for private app subnet 2.
    Type: String

  PrivateDataSubnet1CIDR:
    Default: 10.0.4.0/24
    Description: Please enter the IP range (CIDR notation) for private data subnet 1.
    Type: String

  PrivateDataSubnet2CIDR:
    Default: 10.0.5.0/24
    Description: Please enter the IP range (CIDR notation) for private data subnet 2.
    Type: String

  SSHLocation:
    AllowedPattern: '(\d{1,3})\.(\d{1,3})\.(\d{1,3})\.(\d{1,3})/(\d{1,2})'
    ConstraintDescription: Must be a valid IP CIDR range in the form of x.x.x.x/x.
    Default: 0.0.0.0/0
    Description: The IP address range that can be used to access the web server using SSH.
    MaxLength: '18'
    MinLength: '9'
    Type: String
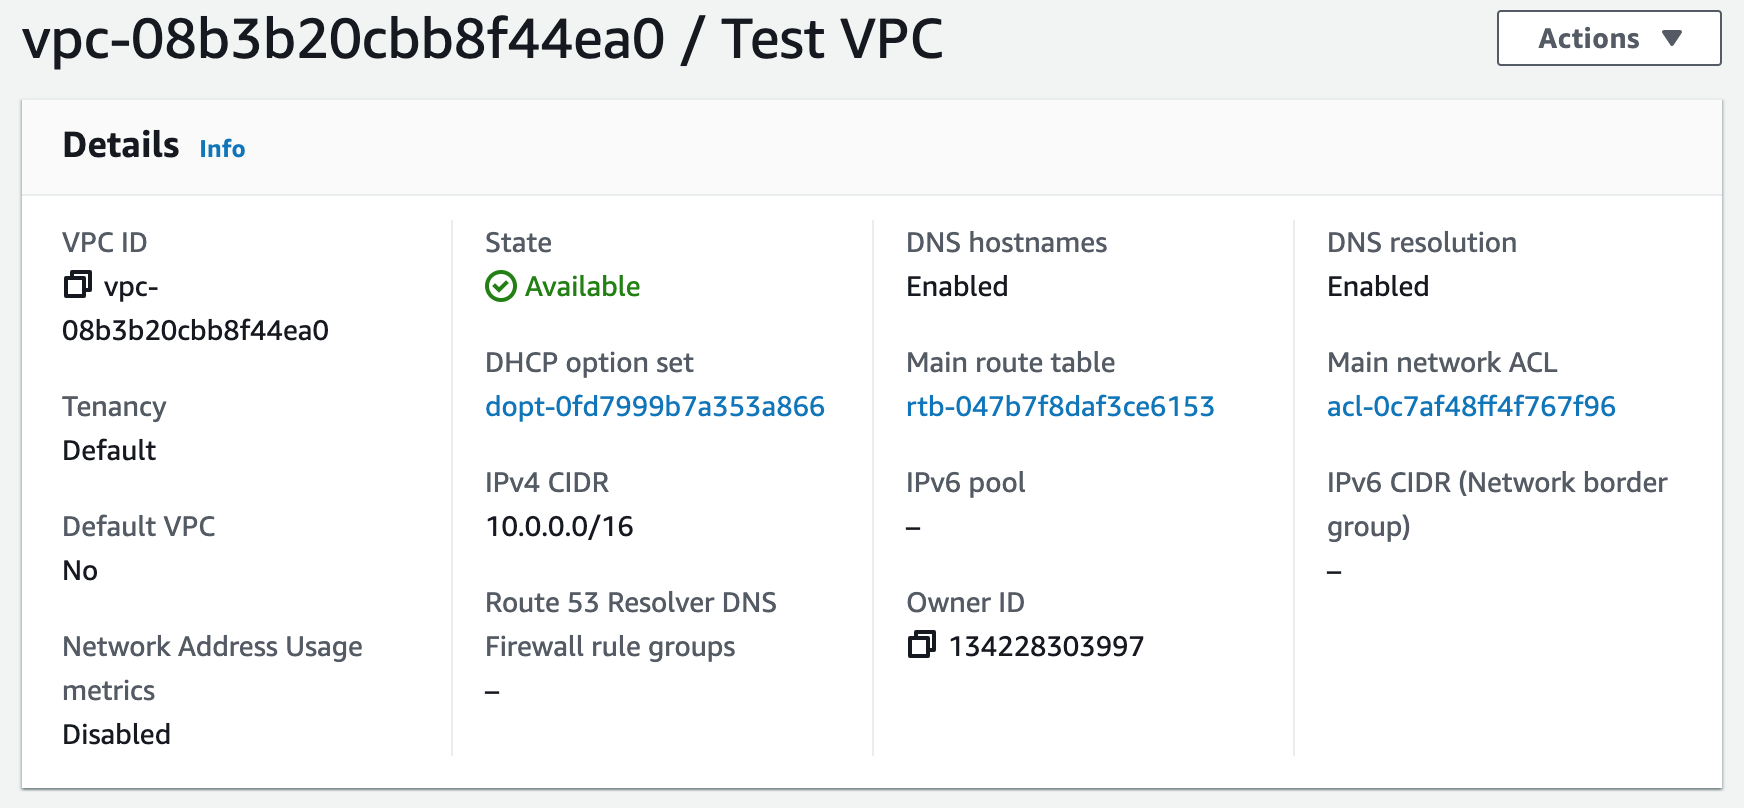
3. We built our VPC.
Resources:
  # Create VPC
  VPC:
    Type: AWS::EC2::VPC
    Properties:
      CidrBlock: !Ref VpcCIDR
      EnableDnsHostnames: true
      EnableDnsSupport: true
      InstanceTenancy: default
      Tags:
        - Key: Name
          Value: Test VPC
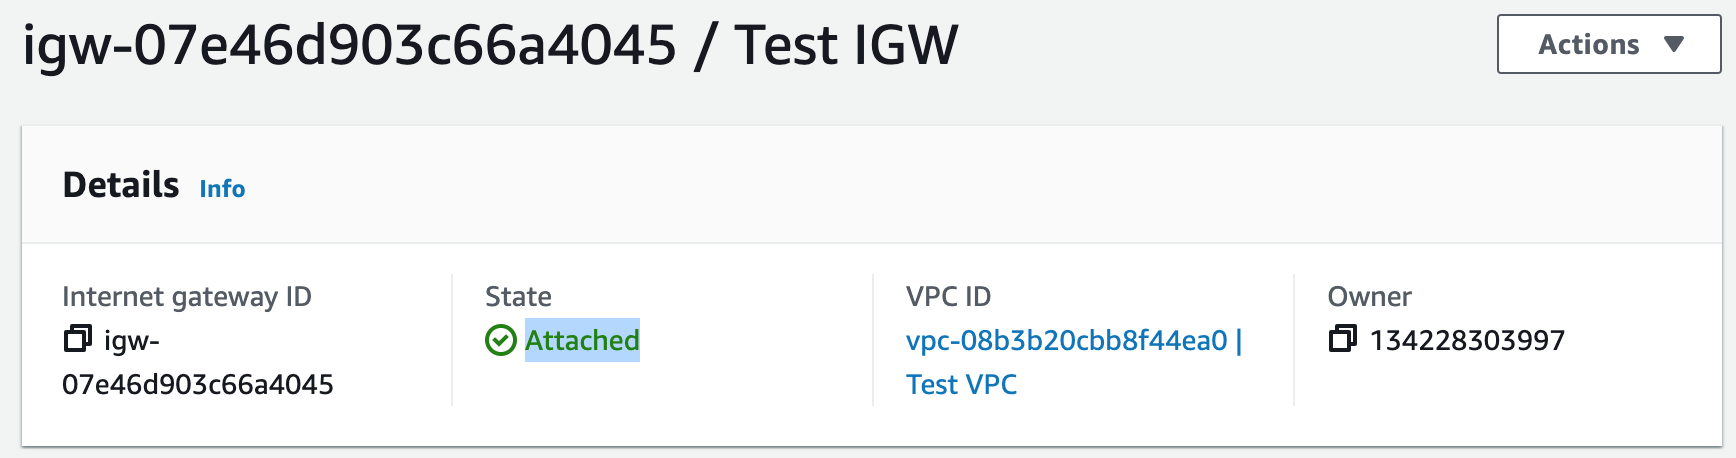
  # Create Internet Gateway
  InternetGateway:
    Type: AWS::EC2::InternetGateway
    Properties:
      Tags:
        - Key: Name
          Value: Test IGW

  # Attach Internet Gateway to VPC
  InternetGatewayAttachment:
    Type: AWS::EC2::VPCGatewayAttachment
    Properties:
      InternetGatewayId: !Ref InternetGateway
      VpcId: !Ref VPC
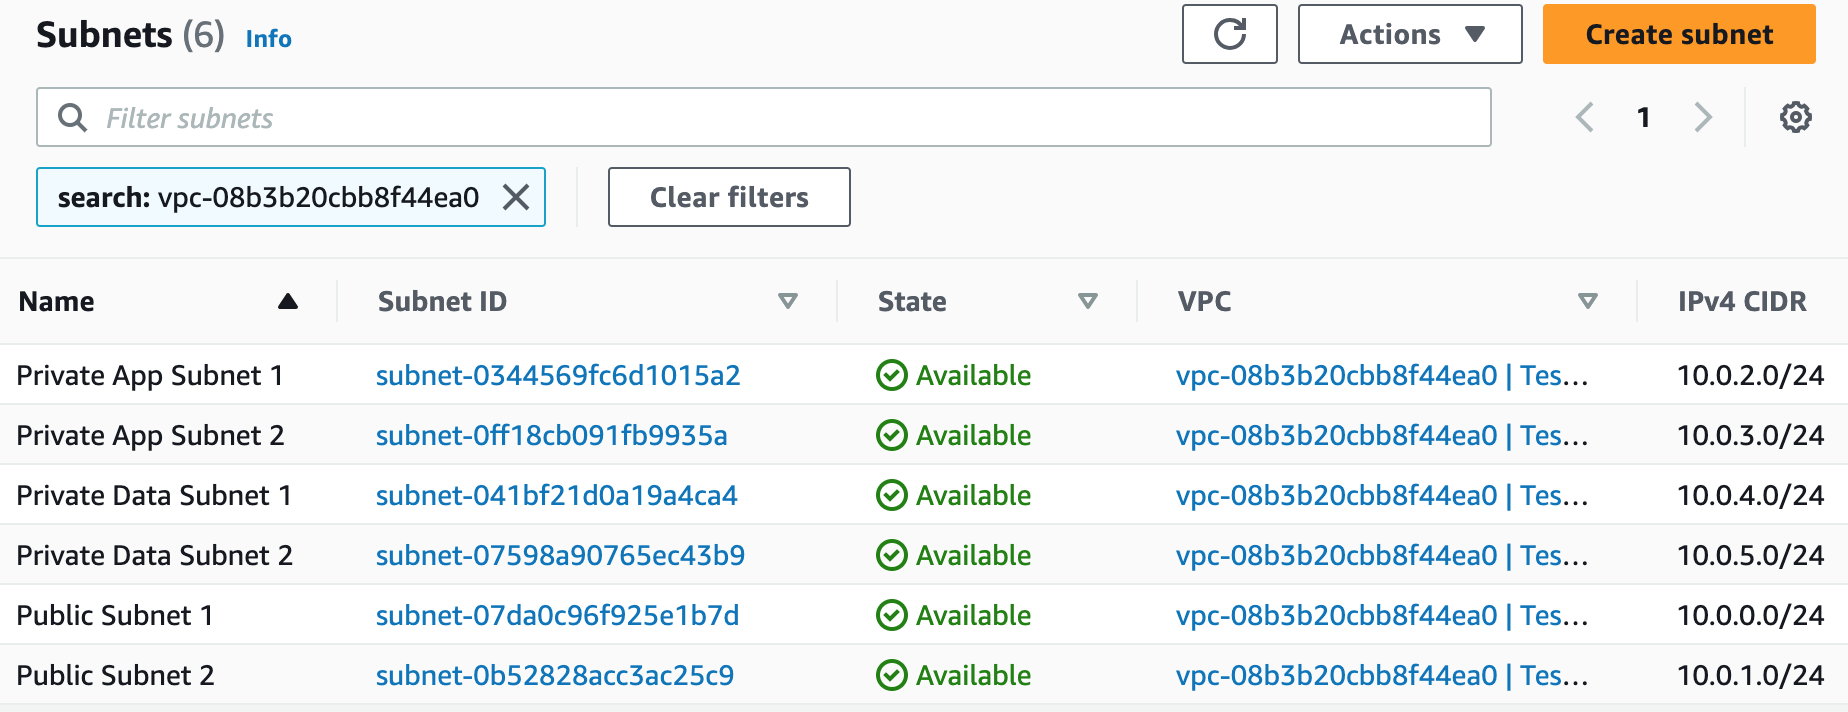
  # Create Public Subnet1
  PublicSubnet1:
    Type: AWS::EC2::Subnet
    Properties:
      AvailabilityZone: !Select [ 0, !GetAZs '' ]
      CidrBlock: !Ref PublicSubnet1CIDR
      MapPublicIpOnLaunch: true
      Tags:
        - Key: Name
          Value: Public Subnet 1
      VpcId: !Ref VPC

  # Create Public Subnet2
  PublicSubnet2:
    Type: AWS::EC2::Subnet
    Properties:
      AvailabilityZone: !Select [ 1, !GetAZs '' ]
      CidrBlock: !Ref PublicSubnet2CIDR
      MapPublicIpOnLaunch: true
      Tags:
        - Key: Name
          Value: Public Subnet 2
      VpcId: !Ref VPC

  # Create Private App Subnet1
  PrivateAppSubnet1:
    Type: AWS::EC2::Subnet
    Properties:
      AvailabilityZone: !Select [ 0, !GetAZs '' ]
      CidrBlock: !Ref PrivateAppSubnet1CIDR
      MapPublicIpOnLaunch: false
      Tags:
        - Key: Name
          Value: Private App Subnet 1
      VpcId: !Ref VPC

  # Create Private App Subnet2
  PrivateAppSubnet2:
    Type: AWS::EC2::Subnet
    Properties:
      AvailabilityZone: !Select [ 1, !GetAZs '' ]
      CidrBlock: !Ref PrivateAppSubnet2CIDR
      MapPublicIpOnLaunch: false
      Tags:
        - Key: Name
          Value: Private App Subnet 2
      VpcId: !Ref VPC

  # Create Private Data Subnet1
  PrivateDataSubnet1:
    Type: AWS::EC2::Subnet
    Properties:
      AvailabilityZone: !Select [ 0, !GetAZs '' ]
      CidrBlock: !Ref PrivateDataSubnet1CIDR
      MapPublicIpOnLaunch: false
      Tags:
        - Key: Name
          Value: Private Data Subnet 1
      VpcId: !Ref VPC

  # Create Private Data Subnet2
  PrivateDataSubnet2:
    Type: AWS::EC2::Subnet
    Properties:
      AvailabilityZone: !Select [ 1, !GetAZs '' ]
      CidrBlock: !Ref PrivateDataSubnet2CIDR
      MapPublicIpOnLaunch: false
      Tags:
        - Key: Name
        Value: Private Data Subnet 2
      VpcId: !Ref VPC
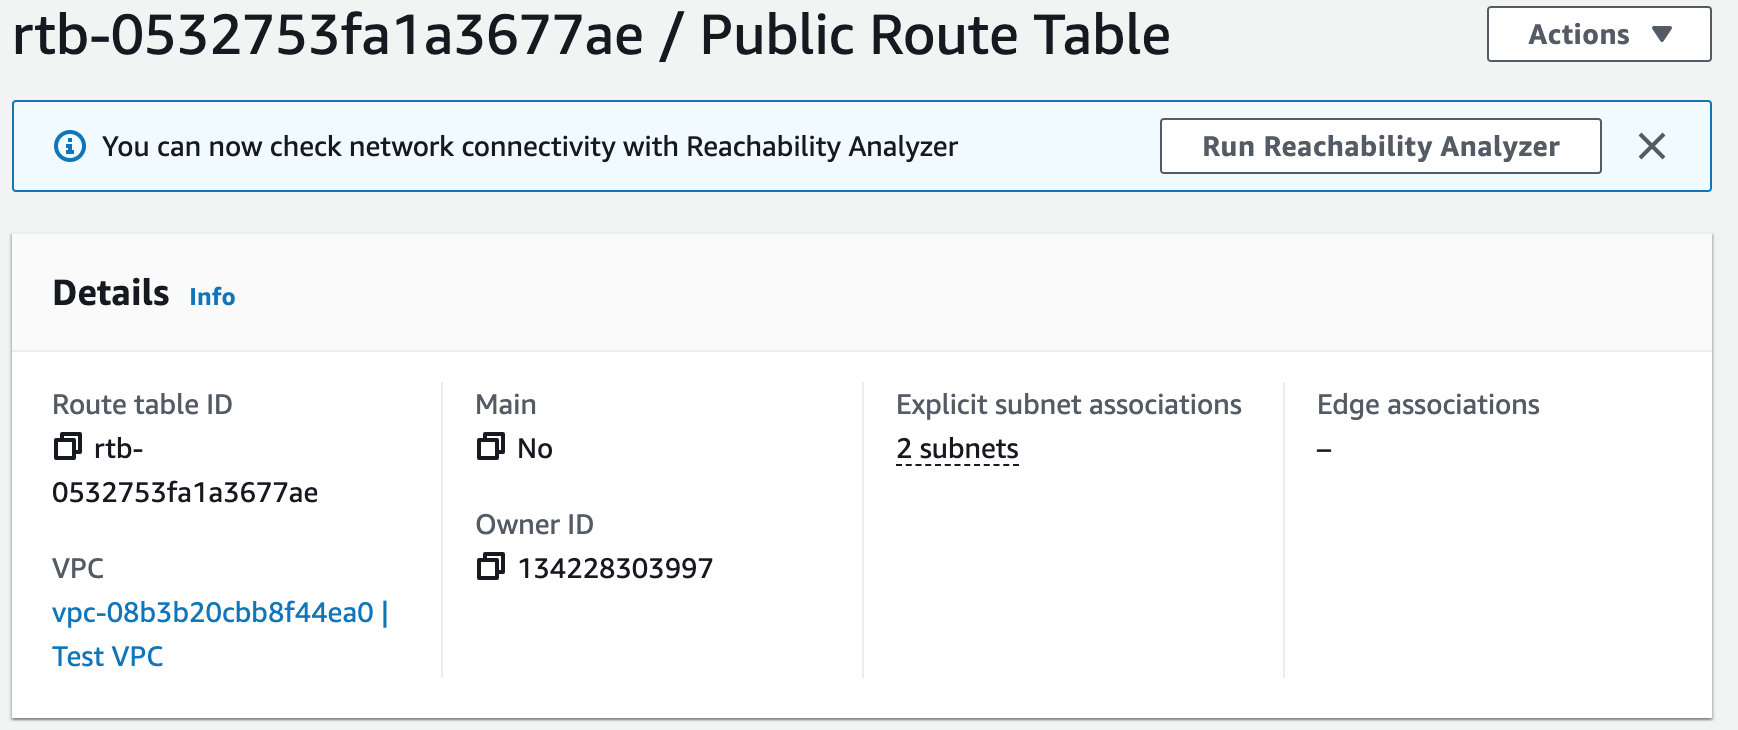
  # Create Route Table
  PublicRouteTable:
    Type: AWS::EC2::RouteTable
    Properties:
      Tags:
        - Key: Name
          Value: Public Route Table
      VpcId: !Ref VPC

  # Add a Public Route to make it a Public Route Table
  PublicRoute:
    Type: AWS::EC2::Route
    Properties:
      DestinationCidrBlock: 0.0.0.0/0
      GatewayId: !Ref InternetGateway
      RouteTableId: !Ref PublicRouteTable

  # Associate Public Subnet1 with Public Route Table
  PublicSubnet1RouteTableAssociation:
    Type: AWS::EC2::SubnetRouteTableAssociation
    Properties:
      RouteTableId: !Ref PublicRouteTable
      SubnetId: !Ref PublicSubnet1

  # Associate Public Subnet2 with Public Route Table
  PublicSubnet2RouteTableAssociation:
    Type: AWS::EC2::SubnetRouteTableAssociation
    Properties:
      RouteTableId: !Ref PublicRouteTable
      SubnetId: !Ref PublicSubnet2
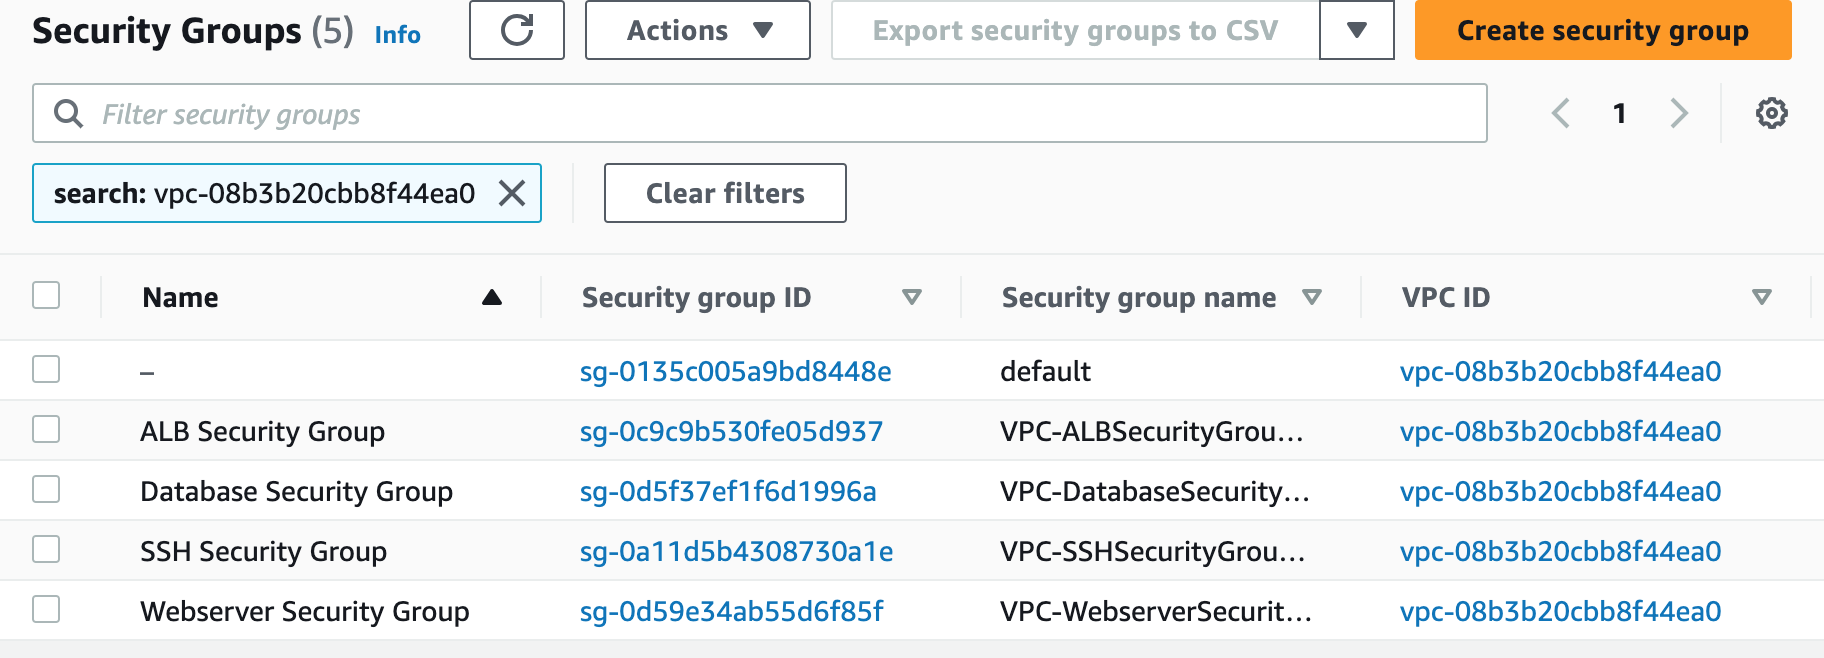
  # Create Security Group for the Application Load Balancer
  ALBSecurityGroup:
    Type: AWS::EC2::SecurityGroup
    Properties:
      GroupDescription: Enables HTTP/HTTPS access on port 80/443.
      SecurityGroupIngress:
        - IpProtocol: tcp
          FromPort: 80
          ToPort: 80
          CidrIp: 0.0.0.0/0
        - IpProtocol: tcp
          FromPort: 443
          ToPort: 443
          CidrIp: 0.0.0.0/0
      Tags:
        - Key: Name
          Value: ALB Security Group
      VpcId: !Ref VPC

  # Create Security Group for the Bastion Host aka Jump Box
  SSHSecurityGroup:
    Type: AWS::EC2::SecurityGroup
    Properties:
      GroupDescription: Enables SSH access on port 22.
      SecurityGroupIngress:
        - IpProtocol: tcp
          FromPort: 22
          ToPort: 22
          CidrIp: !Ref SSHLocation
      Tags:
        - Key: Name
          Value: SSH Security Group
      VpcId: !Ref VPC

  # Create Security Group for the Web Servers
  WebserverSecurityGroup:
    Type: AWS::EC2::SecurityGroup
    Properties:
      GroupDescription: Enables HTTP/HTTPS access via port 80/443 from ALB and SSH security group.
      SecurityGroupIngress:
        - IpProtocol: tcp
          FromPort: 80
          ToPort: 80
          SourceSecurityGroupId: !Ref ALBSecurityGroup
        - IpProtocol: tcp
          FromPort: 443
          ToPort: 443
          SourceSecurityGroupId: !Ref ALBSecurityGroup
        - IpProtocol: tcp
          FromPort: 22
          ToPort: 22
          SourceSecurityGroupId: !Ref SSHSecurityGroup
      Tags:
        - Key: Name
          Value: Webserver Security Group
      VpcId: !Ref VPC

  # Create Security Group for the Database
  DatabaseSecurityGroup:
    Type: AWS::EC2::SecurityGroup
    Properties:
      GroupDescription: Open database for access.
      SecurityGroupIngress:
        - IpProtocol: tcp
          FromPort: 3306
          ToPort: 3306
          SourceSecurityGroupId: !Ref WebserverSecurityGroup
      Tags:
        - Key: Name
          Value: Database Security Group
      VpcId: !Ref VPC
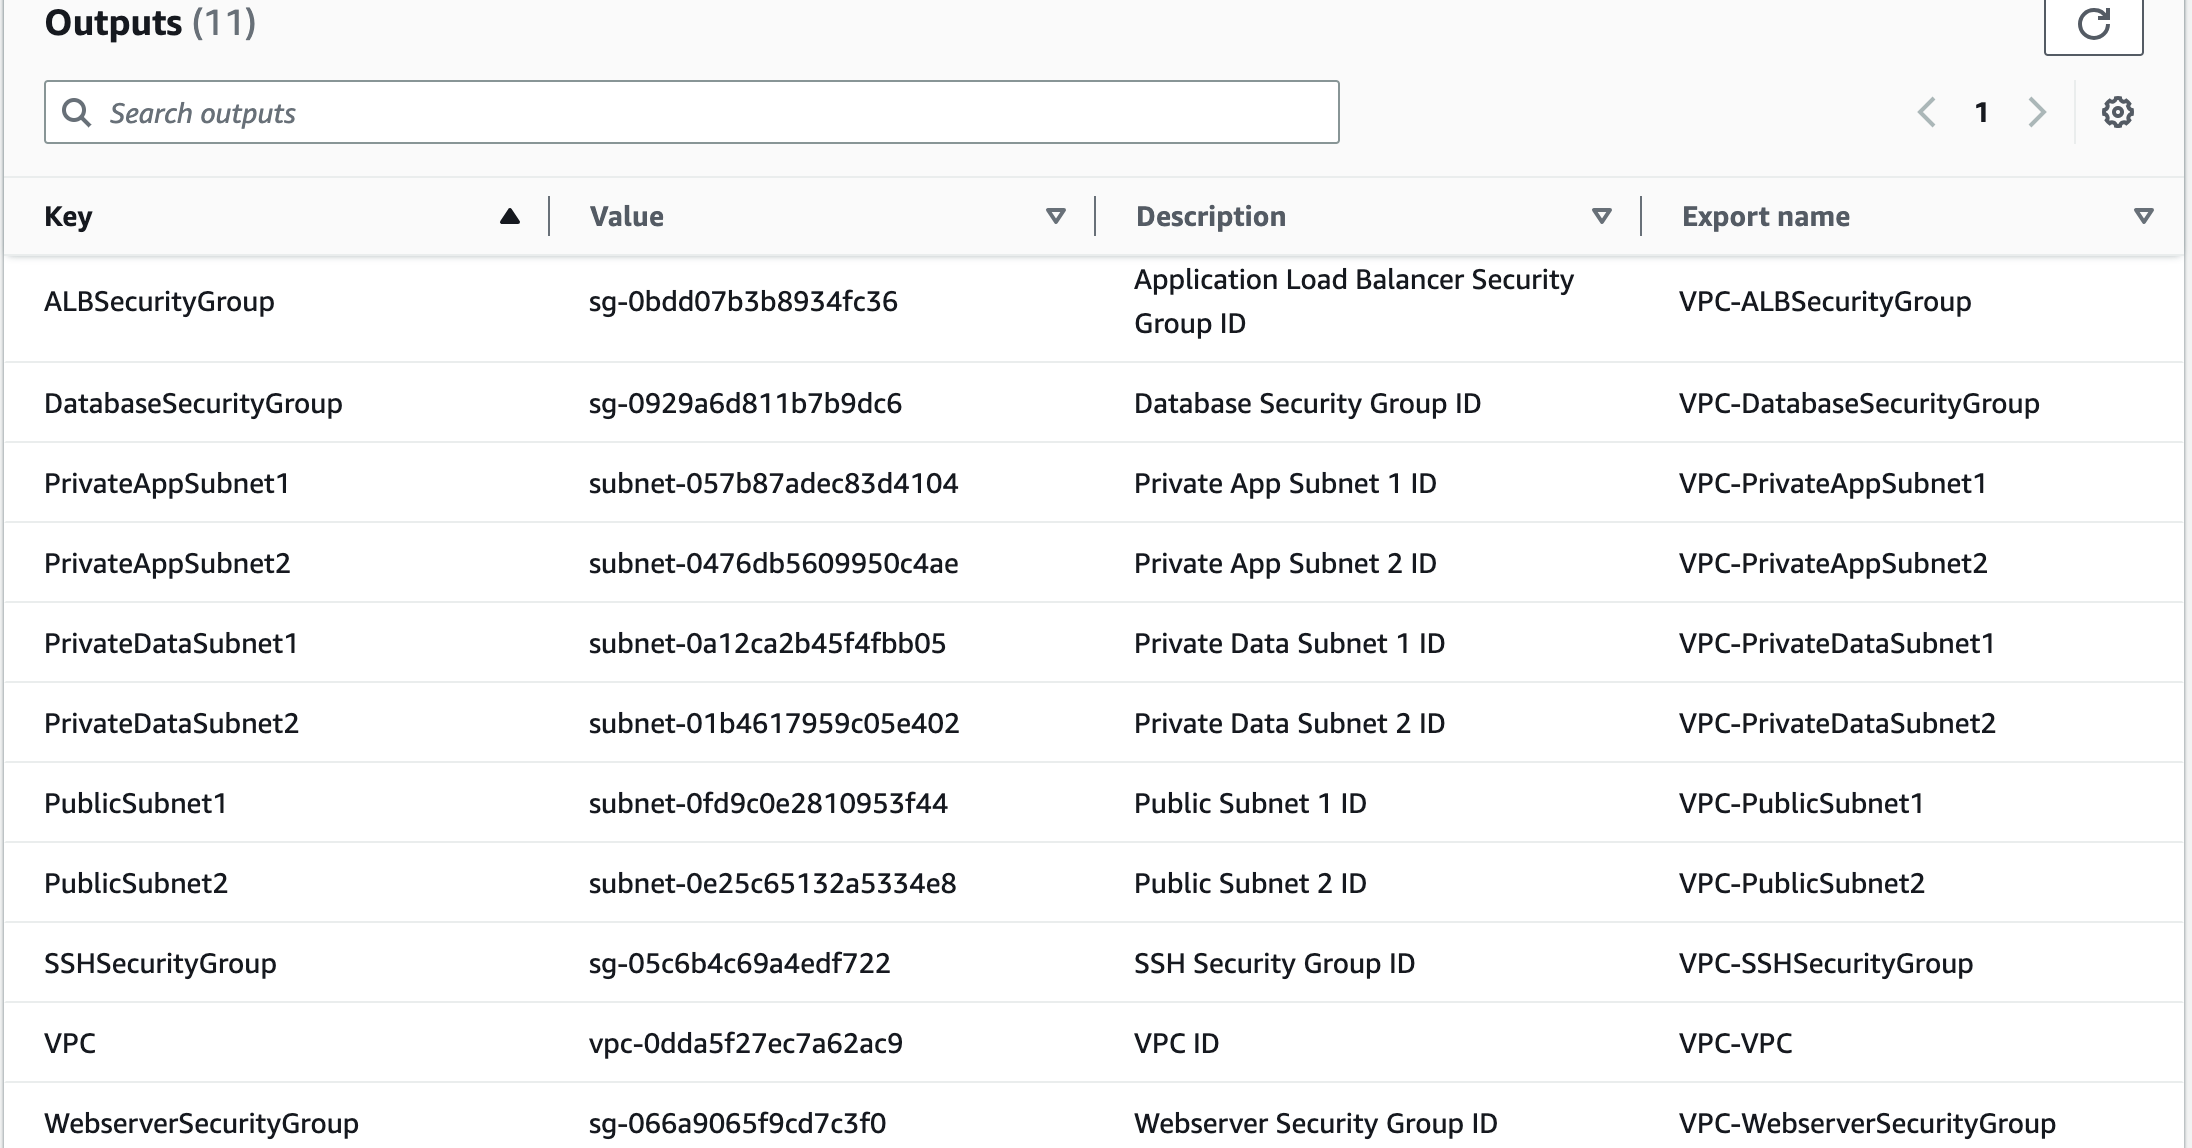
# Create outputs to export some information about our VPC so we can reference the information in another CloudFormation template.
Outputs:
  VPC:
    Description: VPC ID
    Export:
      Name: !Sub ${AWS::StackName}-VPC
    Value: !Ref VPC

  PublicSubnet1:
    Description: Public Subnet 1 ID
    Export:
      Name: !Sub ${AWS::StackName}-PublicSubnet1
    Value: !Ref PublicSubnet1

  PublicSubnet2:
    Description: Public Subnet 2 ID
    Export:
      Name: !Sub ${AWS::StackName}-PublicSubnet2
    Value: !Ref PublicSubnet2

  PrivateAppSubnet1:
    Description: Private App Subnet 1 ID
    Export:
      Name: !Sub ${AWS::StackName}-PrivateAppSubnet1
    Value: !Ref PrivateAppSubnet1

  PrivateAppSubnet2:
    Description: Private App Subnet 2 ID
    Export:
      Name: !Sub ${AWS::StackName}-PrivateAppSubnet2
    Value: !Ref PrivateAppSubnet2

  PrivateDataSubnet1:
    Description: Private Data Subnet 1 ID
    Export:
      Name: !Sub ${AWS::StackName}-PrivateDataSubnet1
    Value: !Ref PrivateDataSubnet1

  PrivateDataSubnet2:
    Description: Private Data Subnet 2 ID
    Export:
      Name: !Sub ${AWS::StackName}-PrivateDataSubnet2
    Value: !Ref PrivateDataSubnet2

  ALBSecurityGroup:
    Description: Application Load Balancer Security Group ID
    Export:
      Name: !Sub ${AWS::StackName}-ALBSecurityGroup
    Value: !Ref ALBSecurityGroup

  SSHSecurityGroup:
    Description: SSH Security Group ID
    Export:
      Name: !Sub ${AWS::StackName}-SSHSecurityGroup
    Value: !Ref SSHSecurityGroup

  WebserverSecurityGroup:
    Description: Webserver Security Group ID
    Export:
      Name: !Sub ${AWS::StackName}-WebserverSecurityGroup
    Value: !Ref WebserverSecurityGroup

  DatabaseSecurityGroup:
    Description: Database Security Group ID
    Export:
      Name: !Sub ${AWS::StackName}-DatabaseSecurityGroup
    Value: !Ref DatabaseSecurityGroup
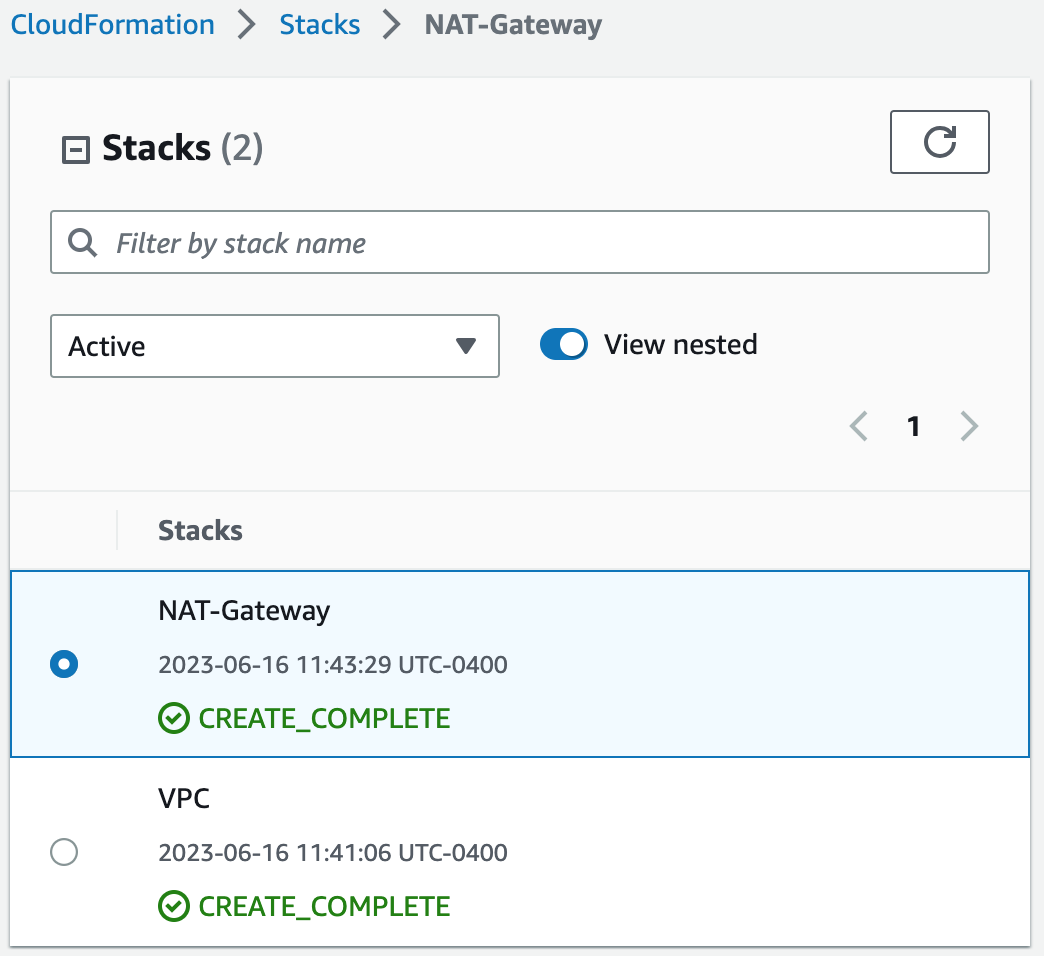
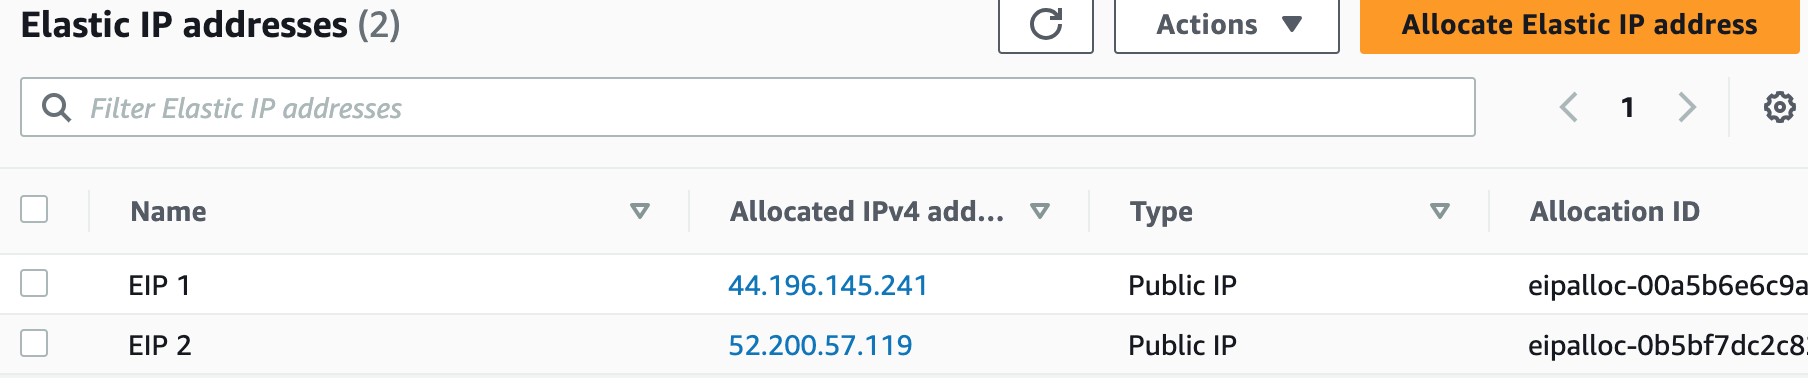
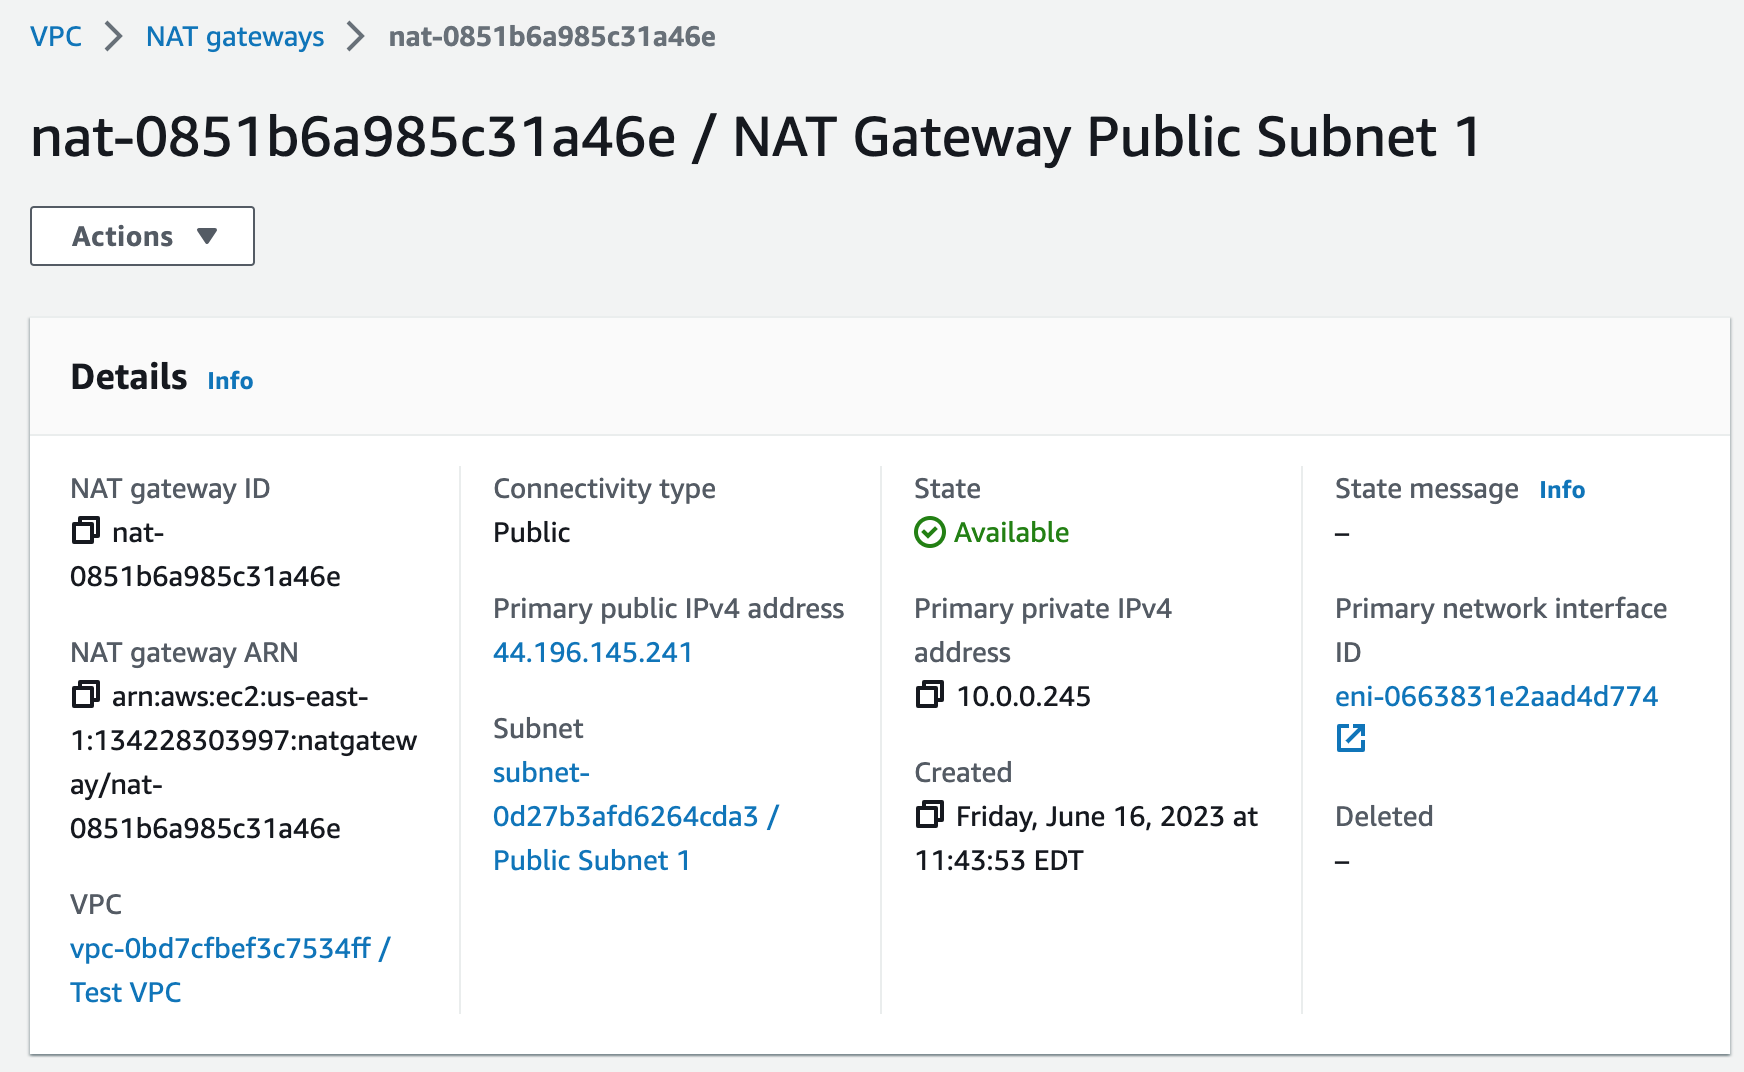
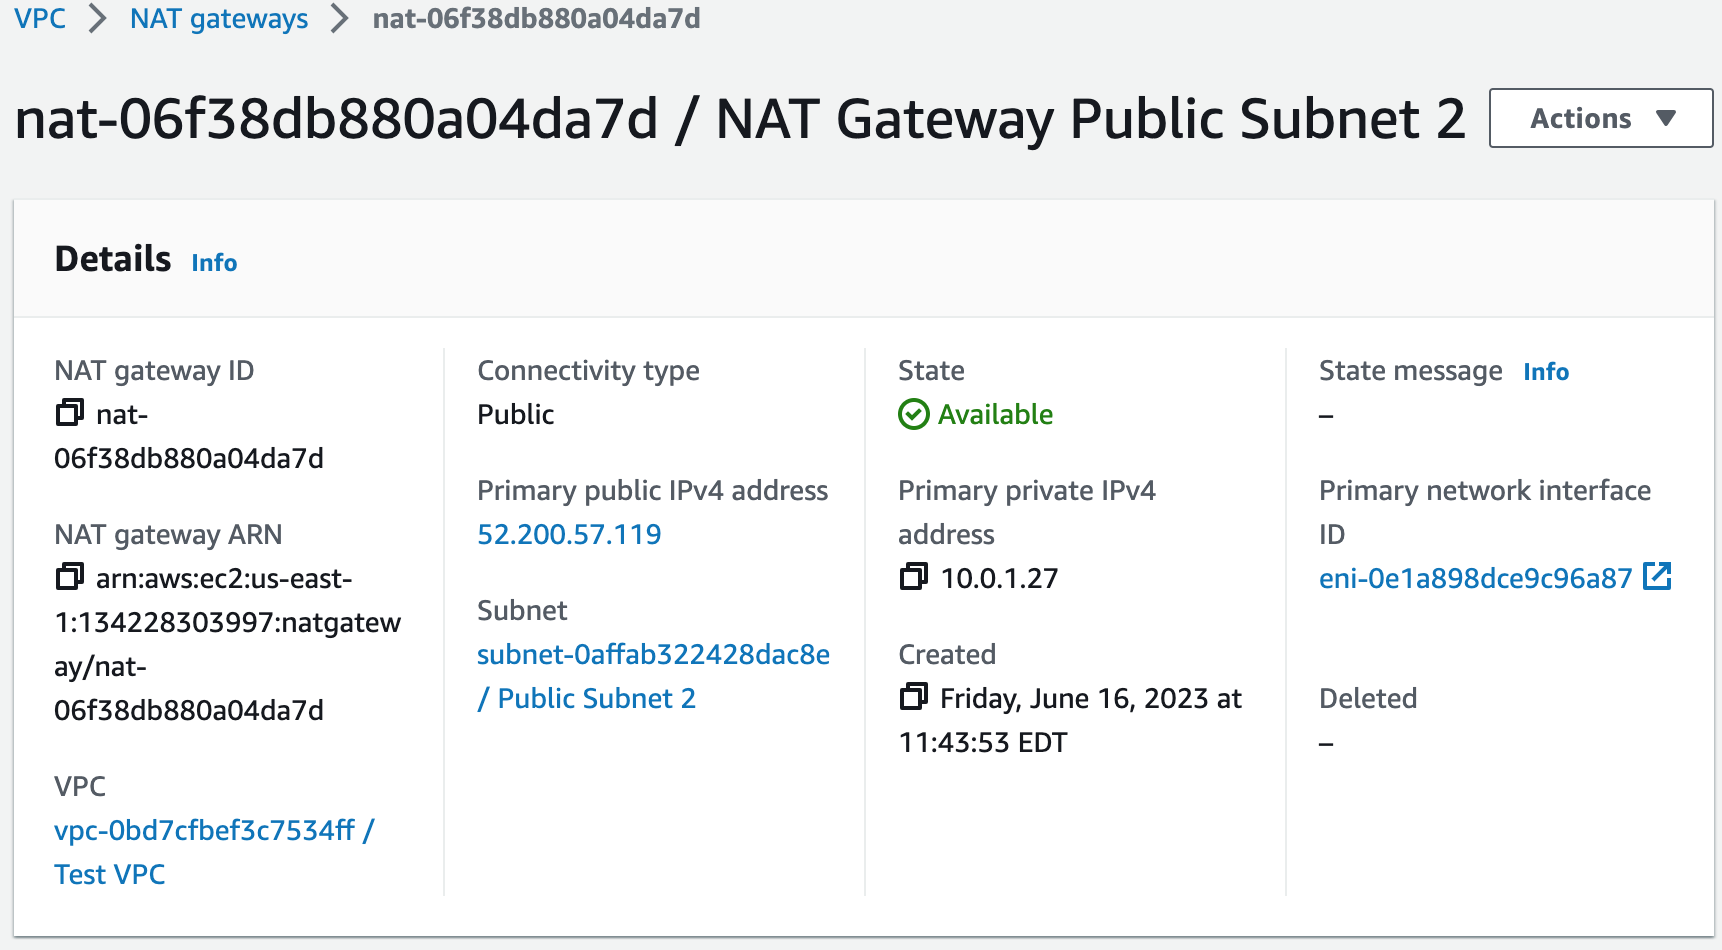
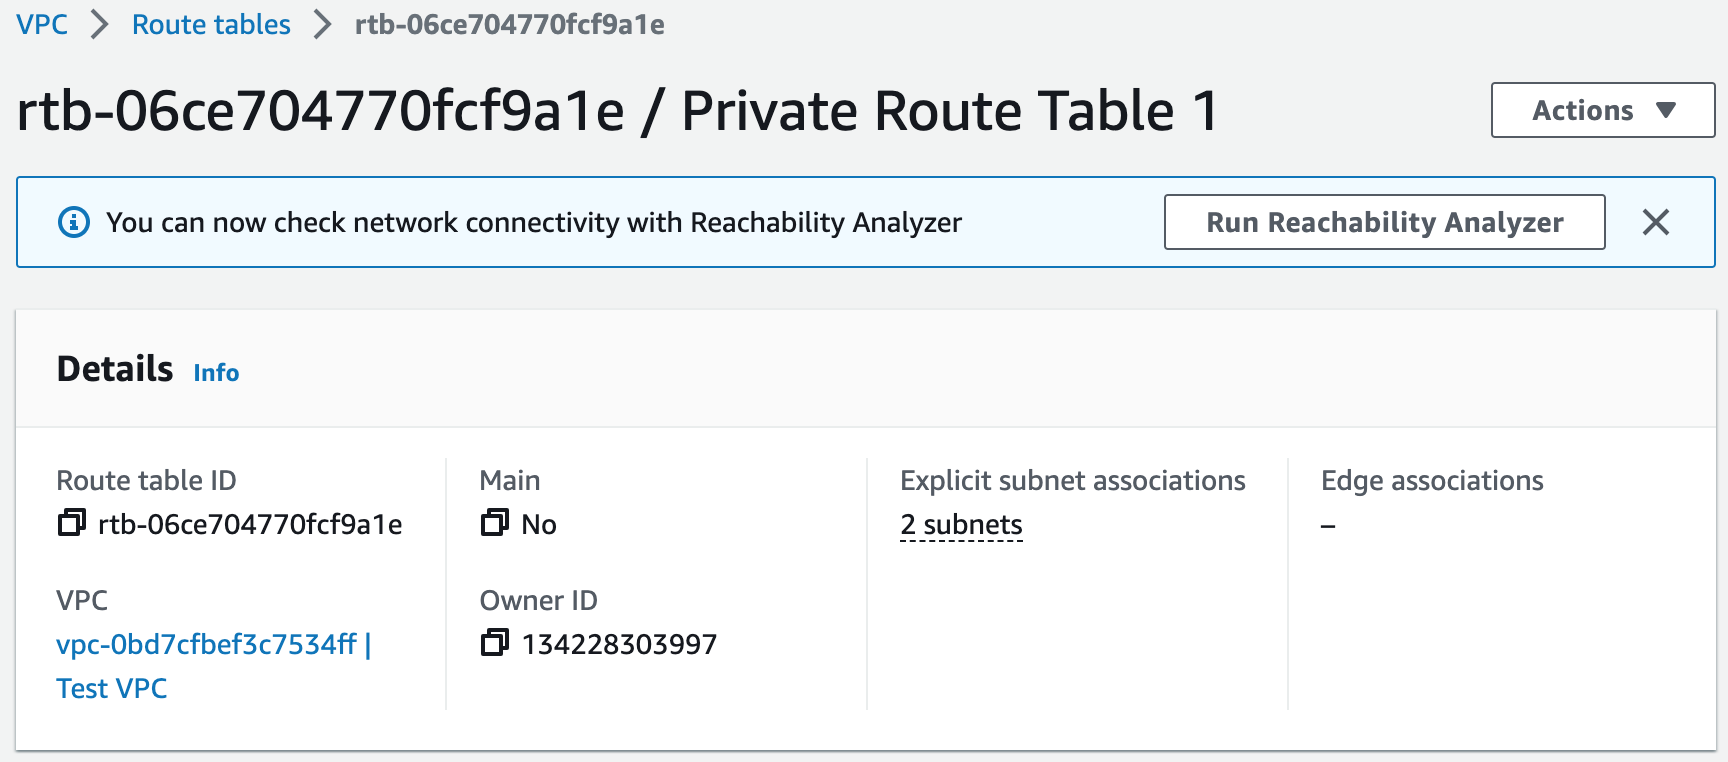
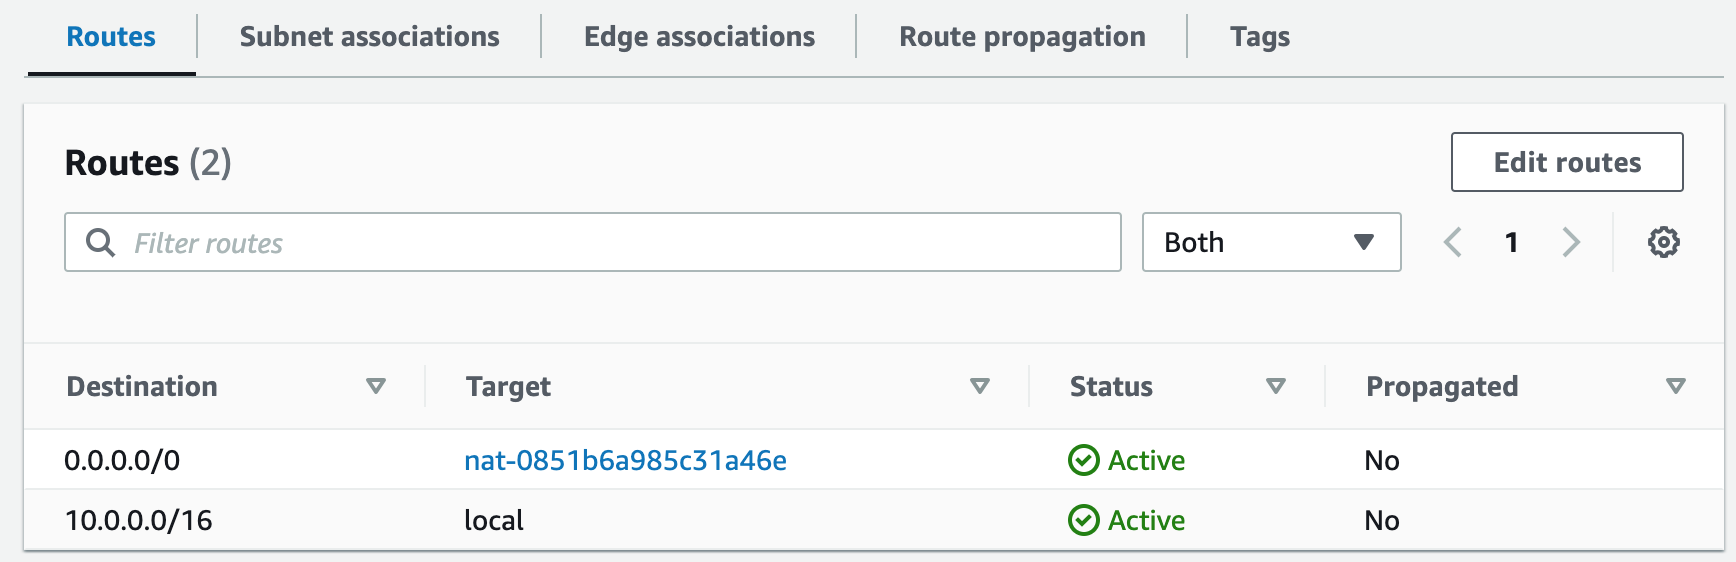
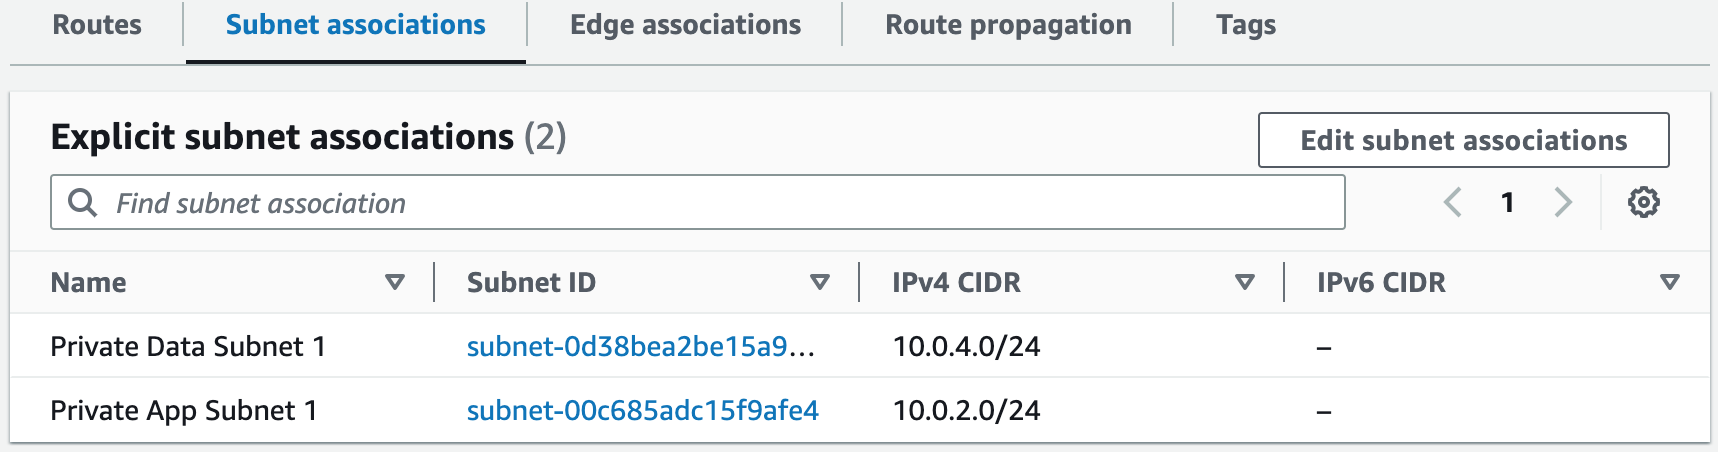
Step 2: Create NAT Gateways
In this step, we will create NAT gateways in our public subnets to allow instances in our private subnets to gain access to the Internet.NAT Gateways Template
1. We are going to create another stack (With new resources (standard)).
- AWSTemplateFormatVersion
- Description
- Parameters
AWSTemplateFormatVersion: 2010-09-09

Description: This template creates a NAT gateway in each of the public subnets.

Parameters:
  ExportVpcStackName:
    Description: The name of the VPC stack that exports values.
    Type: String
3. With this build, we allocated two elastic IPs.
Resources:
  # Allocate Elastic IP Address (EIP 1)
  NatGateway1EIP:
    Type: AWS::EC2::EIP
    Properties:
      Domain: VPC
      Tags:
        - Key: Name
          Value: EIP 1

  # Allocate Elastic IP Address (EIP 2)
  NatGateway2EIP:
    Type: AWS::EC2::EIP
    Properties:
      Domain: VPC
      Tags:
        - Key: Name
          Value: EIP 2
  # Create NAT Gateway 1 in Public Subnet 1
  NatGateway1:
    Type: AWS::EC2::NatGateway
    Properties:
      AllocationId: !GetAtt NatGateway1EIP.AllocationId
      SubnetId:
        Fn::ImportValue: !Sub ${ExportVpcStackName}-PublicSubnet1
      Tags:
        - Key: Name
          Value: NAT Gateway Public Subnet 1
  # Create NAT Gateway 2 in Public Subnet 2
  NatGateway2:
    Type: AWS::EC2::NatGateway
    Properties:
      AllocationId: !GetAtt NatGateway2EIP.AllocationId
      SubnetId:
        Fn::ImportValue: !Sub ${ExportVpcStackName}-PublicSubnet2
      Tags:
        - Key: Name
          Value: NAT Gateway Public Subnet 2
# Create Private Route Table 1
PrivateRouteTable1:
Type: AWS::EC2::RouteTable
Properties:
Tags:
- Key: Name
Value: Private Route Table 1
VpcId:
Fn::ImportValue: !Sub ${ExportVpcStackName}-VPC
# Add a route to point internet-bound traffic to NAT Gateway 1
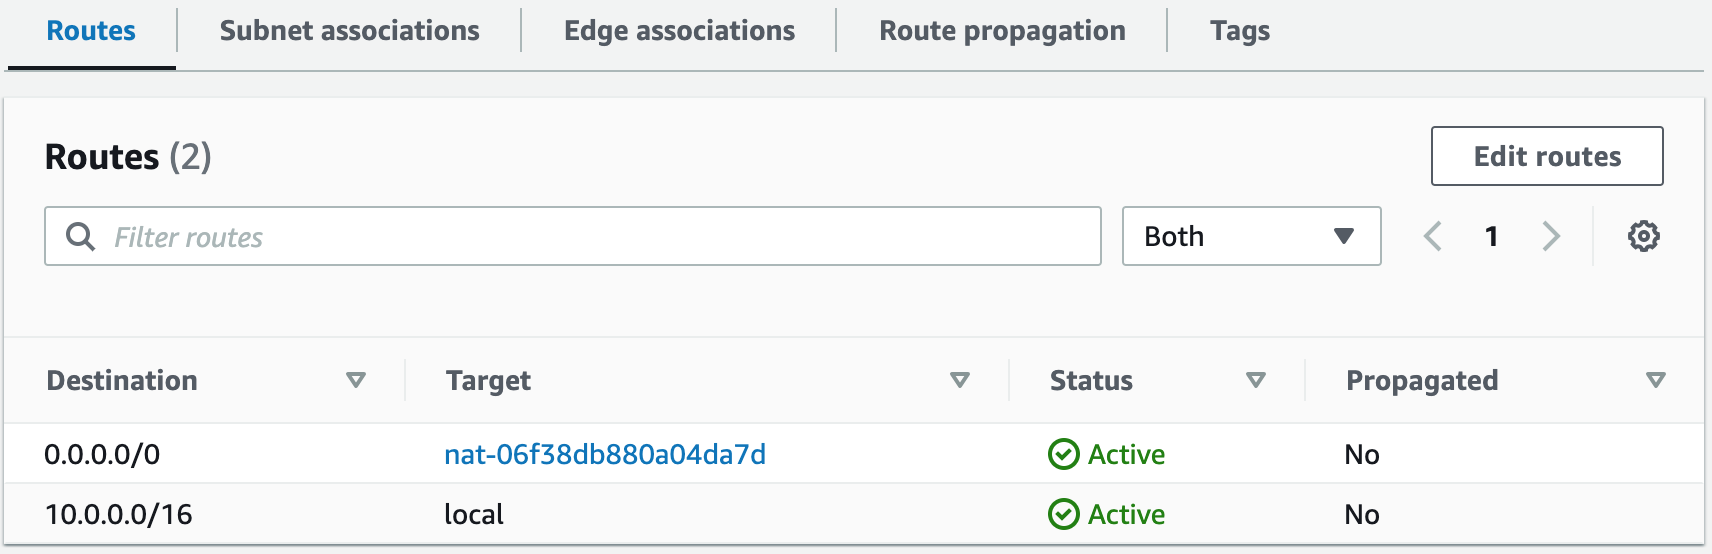
PrivateRoute1:
Type: AWS::EC2::Route
Properties:
DestinationCidrBlock: 0.0.0.0/0
NatGatewayId: !Ref NatGateway1
RouteTableId: !Ref PrivateRouteTable1
# Associate Private App Subnet 1 with Private Route Table 1
PrivateAppSubnet1RouteTableAssociation:
Type: AWS::EC2::SubnetRouteTableAssociation
Properties:
RouteTableId: !Ref PrivateRouteTable1
SubnetId:
Fn::ImportValue: !Sub ${ExportVpcStackName}-PrivateAppSubnet1
# Associate Private Data Subnet 1 with Private Route Table 1
PrivateDataSubnet1RouteTableAssociation:
Type: AWS::EC2::SubnetRouteTableAssociation
Properties:
RouteTableId: !Ref PrivateRouteTable1
SubnetId:
Fn::ImportValue: !Sub ${ExportVpcStackName}-PrivateDataSubnet1
  # Create Private Route Table 2
  PrivateRouteTable2:
    Type: AWS::EC2::RouteTable
    Properties:
      Tags:
        - Key: Name
          Value: Private Route Table 2
      VpcId:
        Fn::ImportValue: !Sub ${ExportVpcStackName}-VPC

  # Add a route to point internet-bound traffic to NAT Gateway 2
  PrivateRoute2:
    Type: AWS::EC2::Route
    Properties:
      DestinationCidrBlock: 0.0.0.0/0
      NatGatewayId: !Ref NatGateway2
      RouteTableId: !Ref PrivateRouteTable2

  # Associate Private App Subnet 2 with Private Route Table 2
  PrivateAppSubnet2RouteTableAssociation:
    Type: AWS::EC2::SubnetRouteTableAssociation
    Properties:
      RouteTableId: !Ref PrivateRouteTable2
      SubnetId:
        Fn::ImportValue: !Sub ${ExportVpcStackName}-PrivateAppSubnet2

  # Associate Private Data Subnet 2 with Private Route Table 2
  PrivateDataSubnet2RouteTableAssociation:
    Type: AWS::EC2::SubnetRouteTableAssociation
    Properties:
      RouteTableId: !Ref PrivateRouteTable2
      SubnetId:
        Fn::ImportValue: !Sub ${ExportVpcStackName}-PrivateDataSubnet2

Step 3: Create an RDS Database From DB Snapshot
In this step, we will use CloudFormation to build an RDS MySQL database by restoring it from a snapshot.RDS Template
1. We are going to create another stack (With new resources (standard)).
- AWSTemplateFormatVersion
- Description
- Metadata
- Parameters
AWSTemplateFormatVersion: 2010-09-09

Description: This template creates an RDS DB instance that is restored from a DB snapshot.

# The following metadata is used to group the parameters
Metadata:
  AWS::CloudFormation::Interface:
    ParameterGroups:
      -
        Label:
          default: Export VPC Stack Name
        Parameters:
          - ExportVpcStackName
      -
        Label:
          default: Database Parameters
        Parameters:
          - DatabaseInstanceIdentifier
          - DatabaseSnapshotIdentifier
          - DatabaseInstanceClass
          - MultiAZDatabase

# Parameters are used to to build flexible CloudFormation templates
Parameters:
  ExportVpcStackName:
    Description: The name of the VPC stack that exports values.
    Type: String

  DatabaseInstanceIdentifier:
    AllowedPattern: '[a-zA-Z][a-zA-Z0-9]*'
    ConstraintDescription: Must begin with a letter and contain only alphanumeric characters.
    Default: mysqldb
    Description: Instance identifier name.
    MaxLength: 60
    MinLength: 1
    Type: String

  DatabaseSnapshotIdentifier:
    Description: The ARN of the DB snapshot that's used to restore the DB instance.
    Type: String

  DatabaseInstanceClass:
    AllowedValues:
      - db.t1.micro
      - db.t2.micro
      - db.m1.small
      - db.m1.medium
      - db.m1.large
    ConstraintDescription: Must select a valid database instance type.
    Default: db.t2.micro
    Description: The database instance type.
    Type: String

  MultiAZDatabase:
    AllowedValues:
      - true
      - false
    ConstraintDescription: Must be true or false.
    Default: false
    Description: Create a Multi-AZ MySQL Amazon RDS database instance.
    Type: String
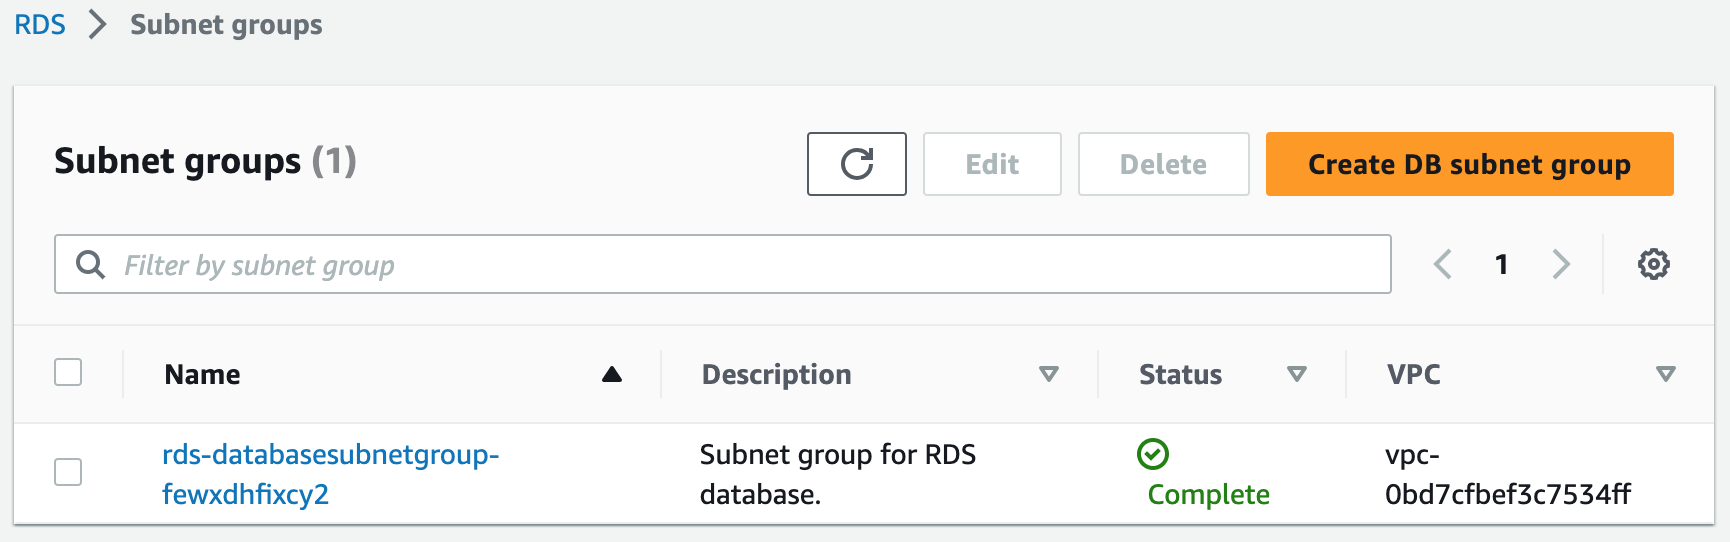
3. With this build, we created a database subnet group.
Resources:
  # Create database subnet group
  DatabaseSubnetGroup:
    Type: AWS::RDS::DBSubnetGroup
    Properties:
      DBSubnetGroupDescription: Subnet group for RDS database.
      SubnetIds:
        - Fn::ImportValue: !Sub ${ExportVpcStackName}-PrivateDataSubnet1
        - Fn::ImportValue: !Sub ${ExportVpcStackName}-PrivateDataSubnet2
      Tags:
        - Key: Name
          Value: Database Subnets
  # Create database from RDS snapshot
  DatabaseInstance:
    Type: AWS::RDS::DBInstance
    Properties:
      AvailabilityZone: !Select [ 0, !GetAZs  '' ]
      DBInstanceClass: !Ref DatabaseInstanceClass
      DBInstanceIdentifier: !Ref DatabaseInstanceIdentifier
      DBSnapshotIdentifier: !Ref DatabaseSnapshotIdentifier
      DBSubnetGroupName: !Ref DatabaseSubnetGroup
      Engine: MySQL
      MultiAZ: !Ref MultiAZDatabase
      VPCSecurityGroups:
        - Fn::ImportValue: !Sub ${ExportVpcStackName}-DatabaseSecurityGroup

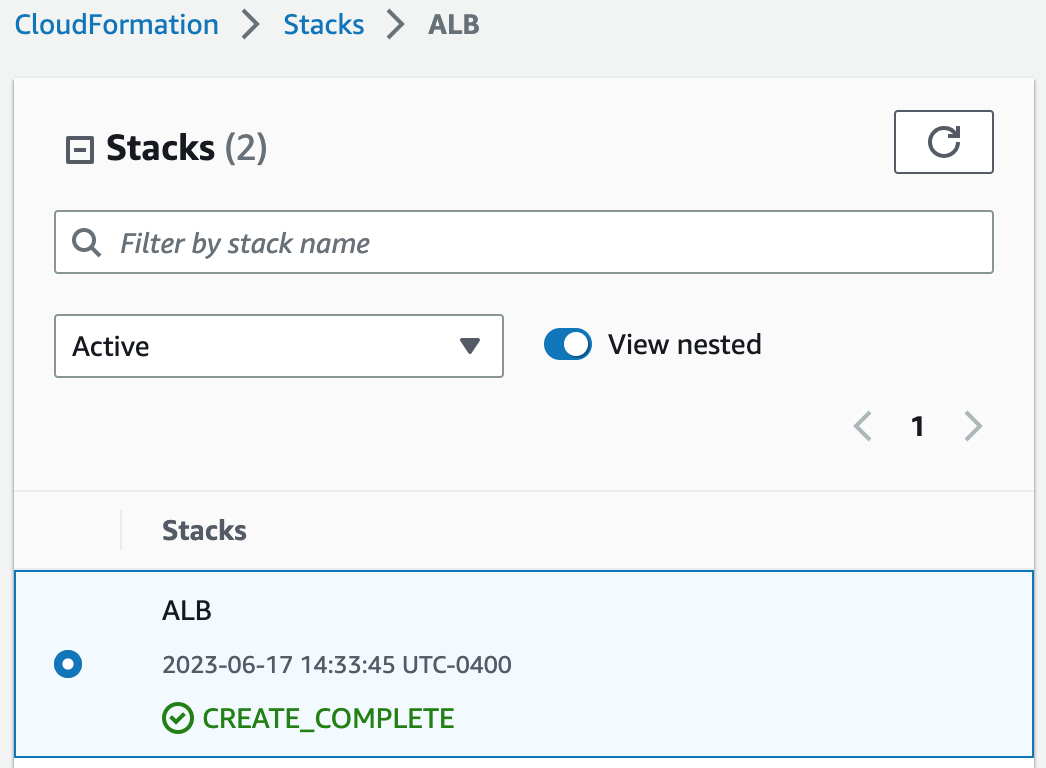
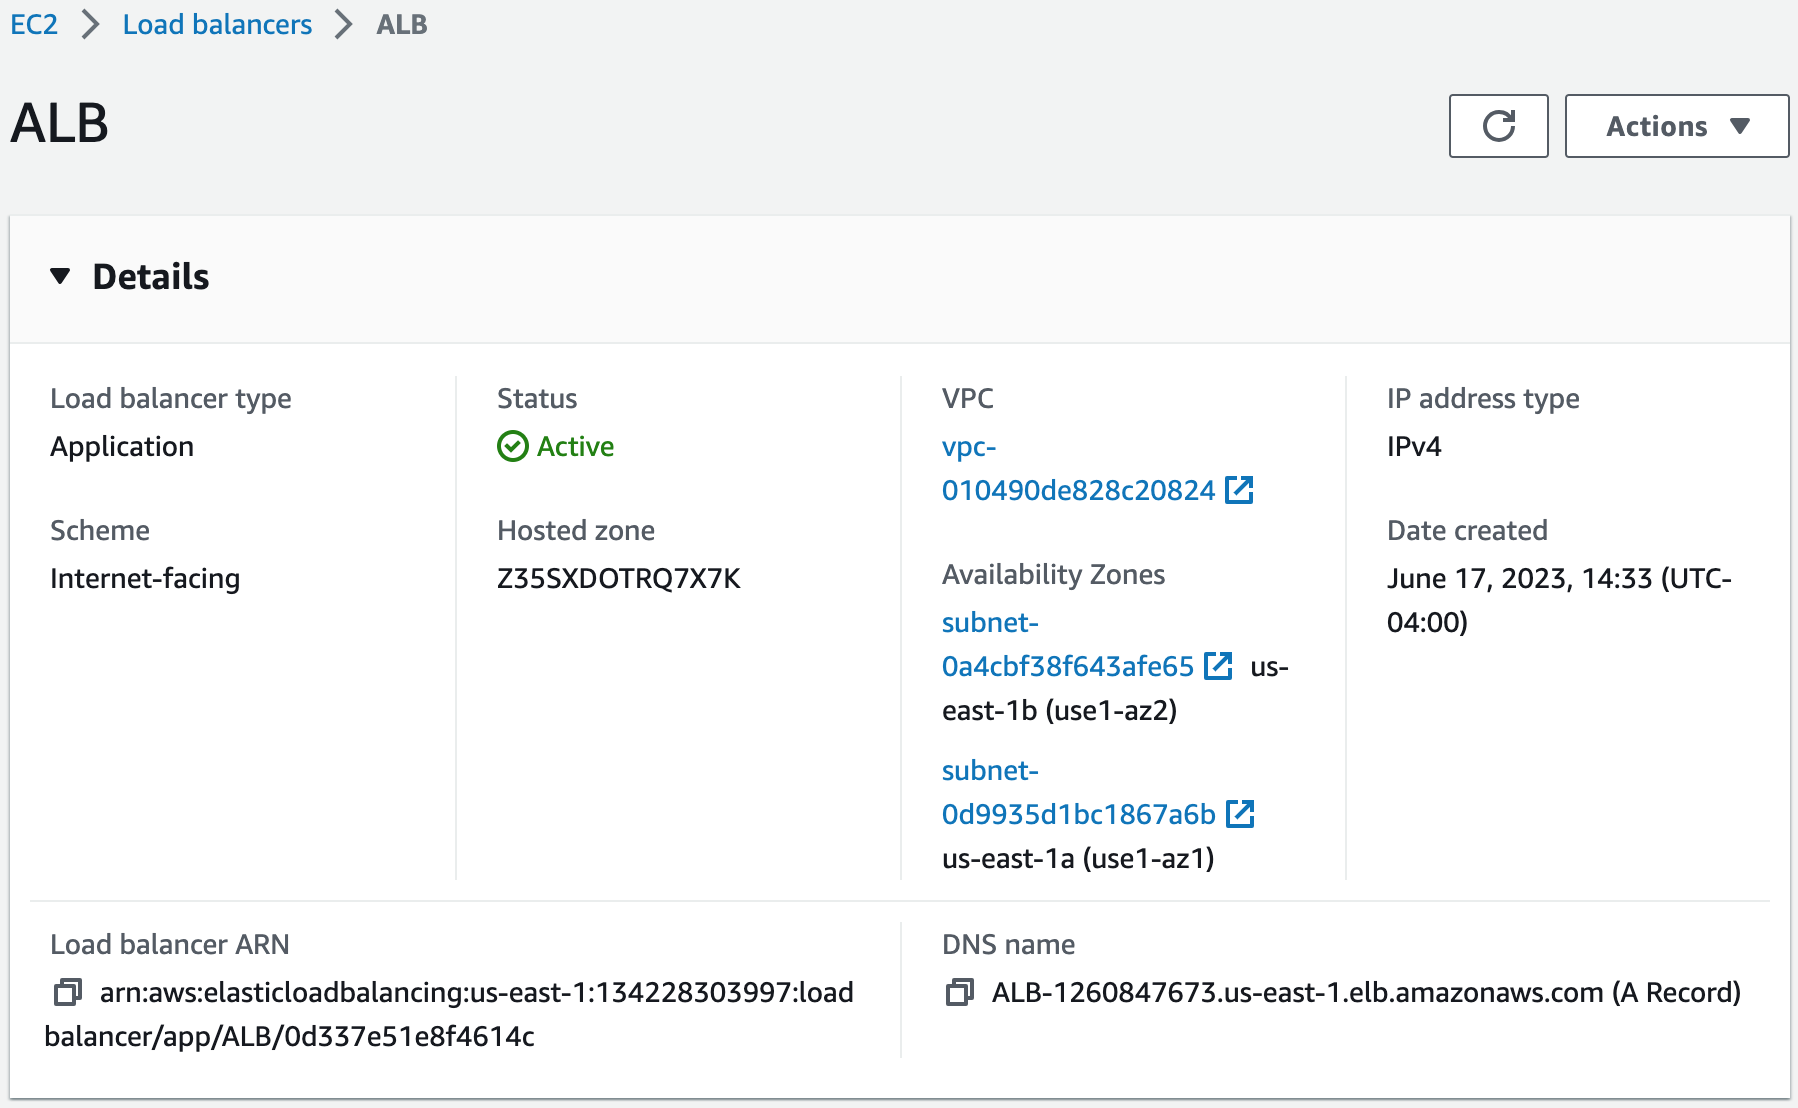
Step 4: Create an Application Load Balancer
In this step, we will use CloudFormation to build an application load balancer.ALB Template
1. We are going to create another stack (With new resources (standard)).
- AWSTemplateFormatVersion
- Description
- Metadata
- Parameters
AWSTemplateFormatVersion: 2010-09-09

Description: This template creates an Application Load Balancer.

# The following metadata is used to group the parameters
Metadata:
  AWS::CloudFormation::Interface:
    ParameterGroups:
      -
        Label:
          default: "Certificate ARN"
        Parameters:
          - AcmCertificate
      -
        Label:
          default: "Export VPC Stack Name"
        Parameters:
          - ExportVpcStackName

# Parameters are used to to build flexible CloudFormation templates
Parameters:
  AcmCertificate:
    Description: The ARN of the AWS Certification Manager's certificate.
    Type: String

  ExportVpcStackName:
    Description: The name of the vpc stack that exports values.
    Type: String
3. With this build, we created an application load balancer.
Resources:
#Create an Application Load Balancer
  ApplicationLoadBalancer:
    Type: AWS::ElasticLoadBalancingV2::LoadBalancer
    Properties:
      Name: ALB
      SecurityGroups:
        - Fn::ImportValue: !Sub ${ExportVpcStackName}-ALBSecurityGroup
      Subnets:
        - Fn::ImportValue: !Sub ${ExportVpcStackName}-PublicSubnet1
        - Fn::ImportValue: !Sub ${ExportVpcStackName}-PublicSubnet2
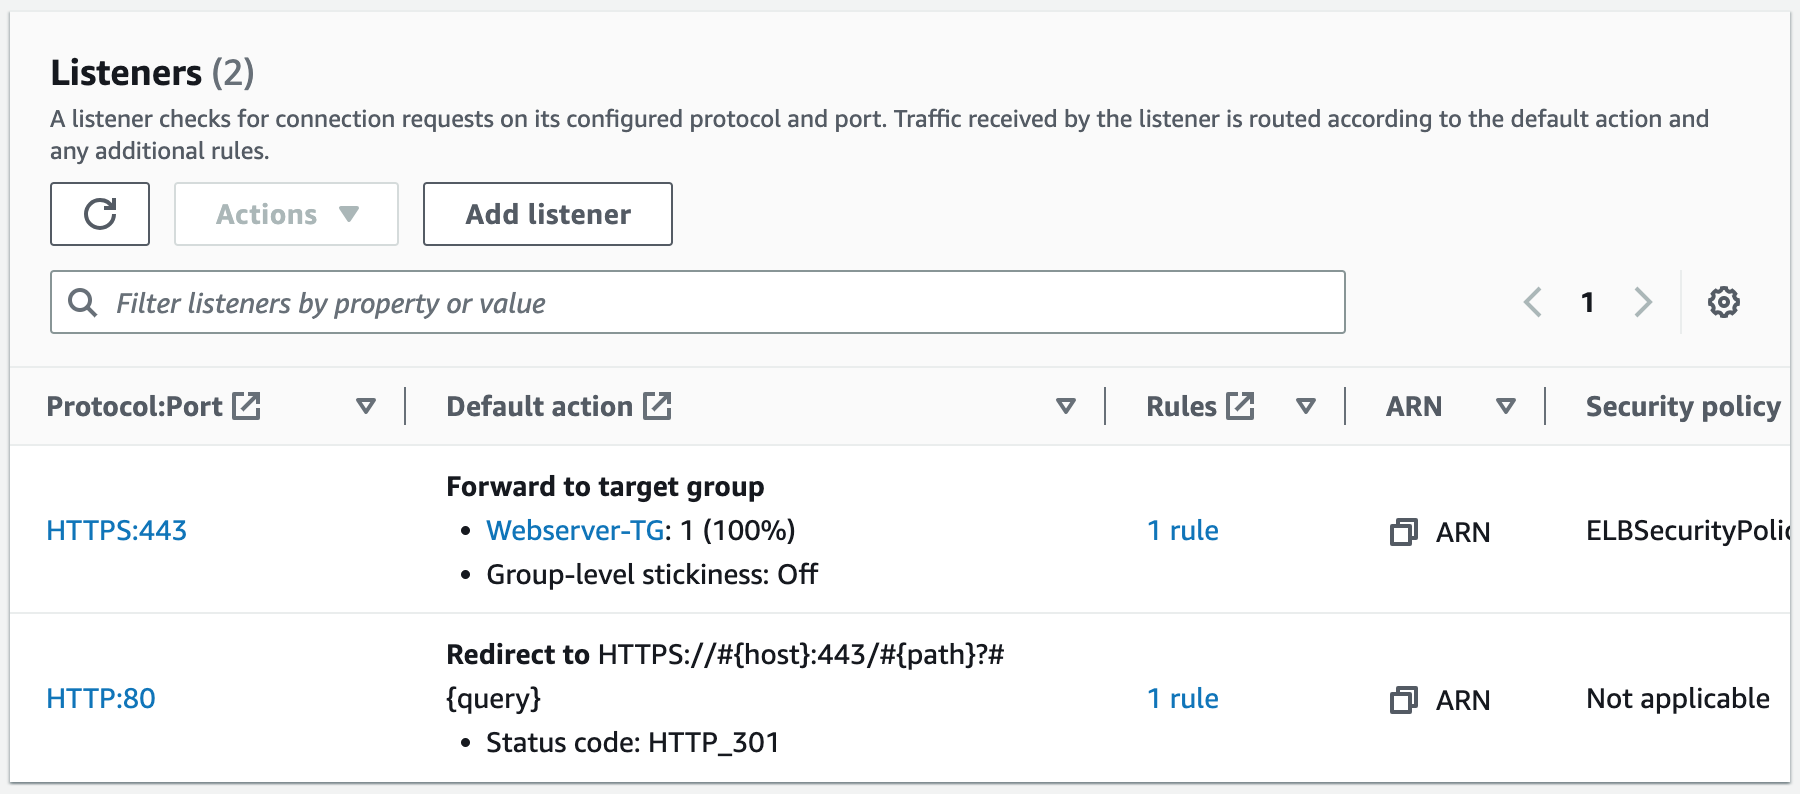
#Create a Listener on Port 80
  ALBListenerNoSslCertificate:
    Type: 'AWS::ElasticLoadBalancingV2::Listener'
    Properties:
      DefaultActions:
        - RedirectConfig:
            Host: '#{host}'
            Path: '/#{path}'
            Port: '443'
            Protocol: HTTPS
            StatusCode: HTTP_301
          Type: redirect
      LoadBalancerArn: !Ref ApplicationLoadBalancer
      Port: 80
      Protocol: HTTP

#Create a Listener on Port 443
  ALBListenerSslCertificate:
    Type : AWS::ElasticLoadBalancingV2::Listener
    Properties:
      Certificates:
        - CertificateArn: !Ref AcmCertificate
      DefaultActions:
        - Type: forward
          TargetGroupArn: !Ref ALBTargetGroup
      LoadBalancerArn: !Ref ApplicationLoadBalancer
      Port: 443
      Protocol: HTTPS
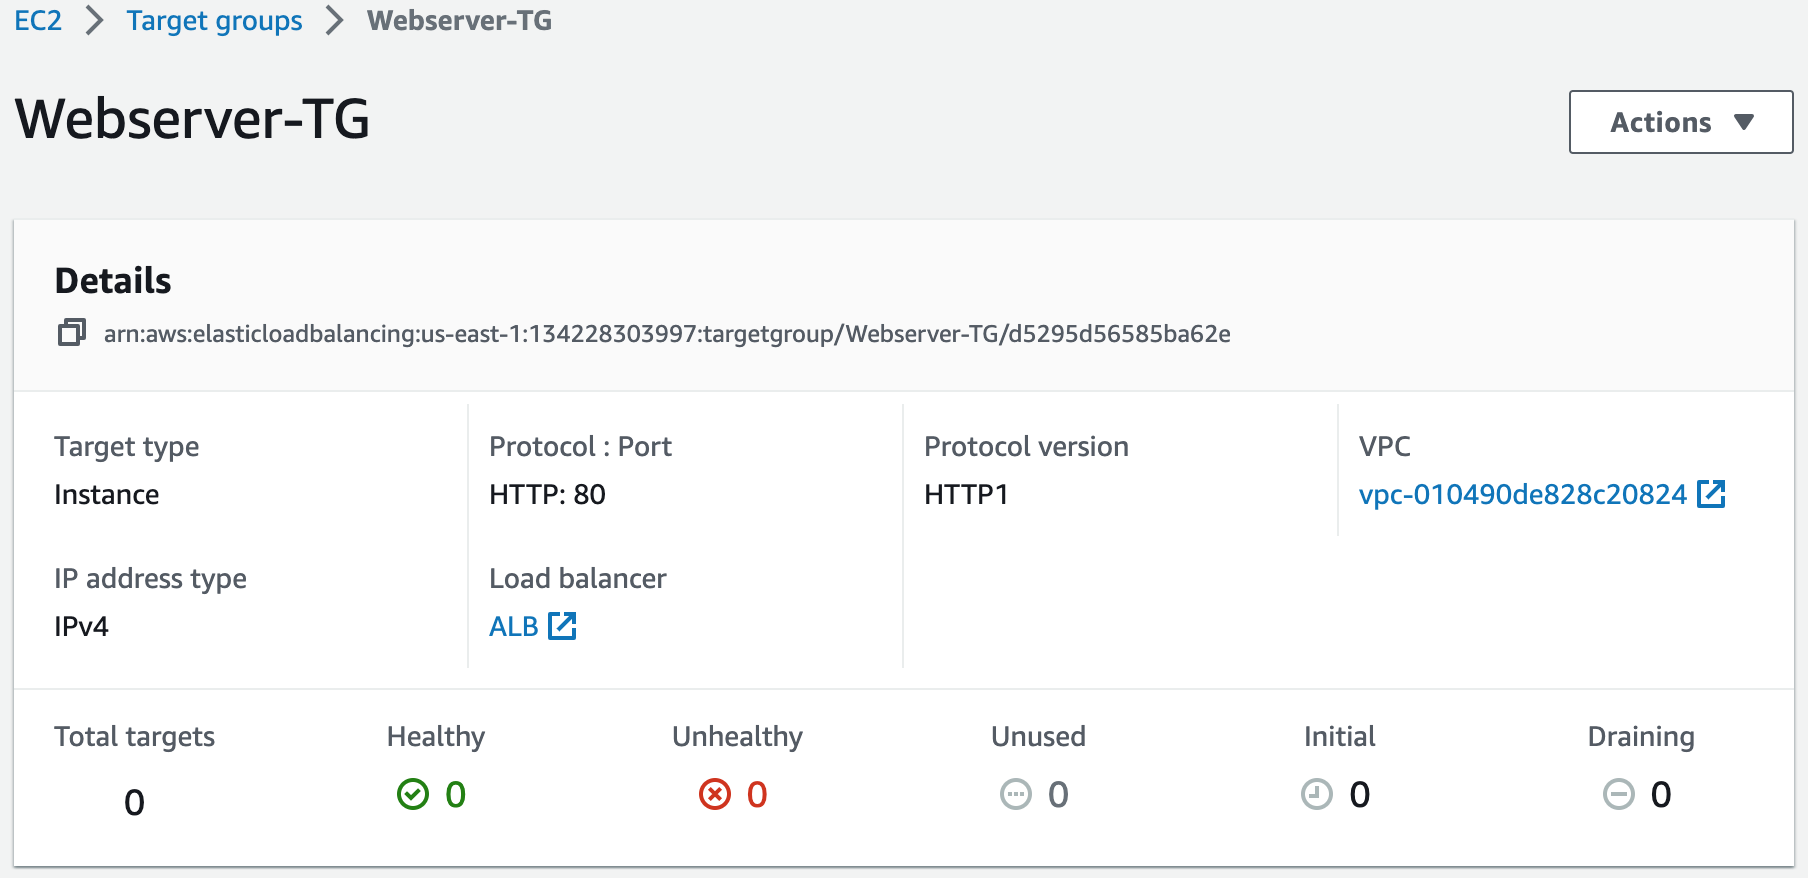
# Create a Target Group
  ALBTargetGroup:
    Type: AWS::ElasticLoadBalancingV2::TargetGroup
    Properties:
      HealthCheckIntervalSeconds: 10
      HealthCheckPath: /
      HealthCheckTimeoutSeconds: 5
      HealthyThresholdCount: 2
      Matcher:
        HttpCode: 200,302
      Name: Webserver-TG
      Port: 80
      Protocol: HTTP
      UnhealthyThresholdCount: 5
      VpcId:
        Fn::ImportValue: !Sub ${ExportVpcStackName}-VPC
Outputs:
# Export Target Group
  ALBTargetGroup:
    Description: Webserver target group
    Export:
      Name: !Sub ${AWS::StackName}-ALBTargetGroup
    Value: !Ref ALBTargetGroup

# Export Application Load Balancer Dns Name
  ApplicationLoadBalancerDnsName:
    Description: Application load balancer DNS name
    Export:
      Name: !Sub ${AWS::StackName}-ApplicationLoadBalancerDnsName
    Value: !GetAtt ApplicationLoadBalancer.DNSName

# Export Application Load Balancer Zone ID
  ApplicationLoadBalancerZoneID:
    Description: Application load balancer canonical hosted zone ID
    Export:
      Name: !Sub ${AWS::StackName}-ApplicationLoadBalancerZoneID
    Value: !GetAtt ApplicationLoadBalancer.CanonicalHostedZoneID

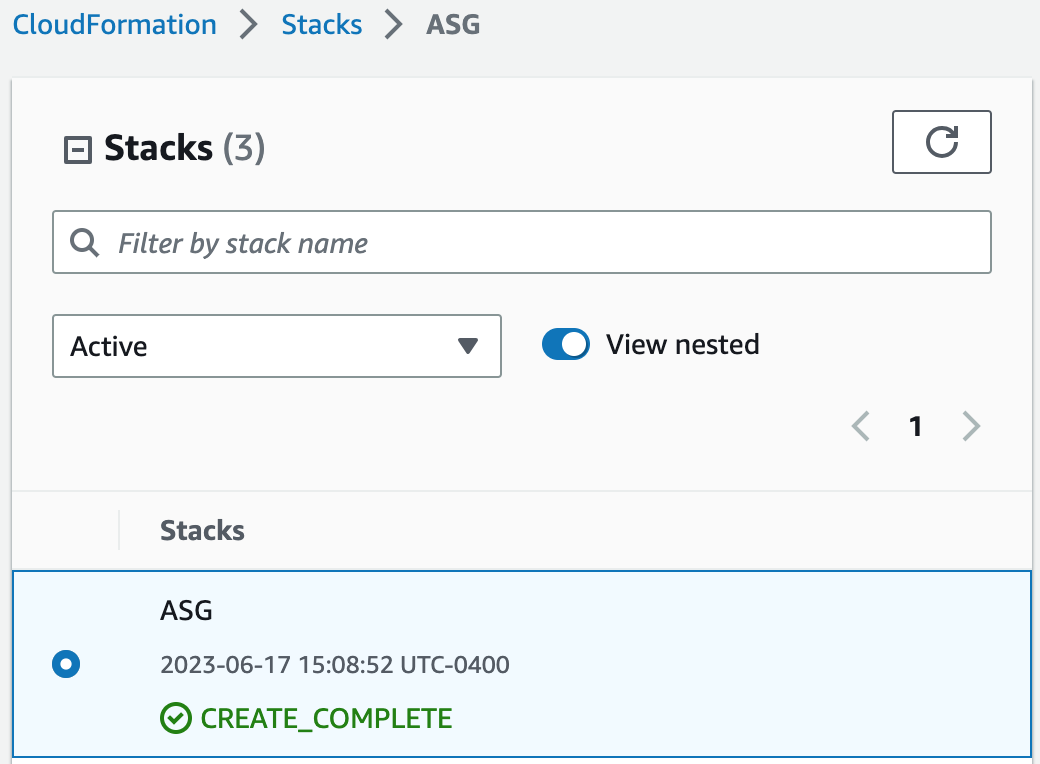
Step 5: Create an Auto Scaling Group
In this step, we will use CloudFormation to build an auto scaling group.ASG Template
1. We are going to create another stack (With new resources (standard)).
- AWSTemplateFormatVersion
- Description
- Metadata
- Parameters
AWSTemplateFormatVersion: 2010-09-09

Description: This template creates an Auto Scaling Group.

# The following metadata is used to group the parameters
Metadata:
  AWS::CloudFormation::Interface:
    ParameterGroups:
      -
        Label:
          default: Export VPC Stack Name
        Parameters:
          - ExportVpcStackName
      -
        Label:
          default: Export ALB Stack Name
        Parameters:
          - ExportAlbStackName
      -
        Label:
          default: Email Address
        Parameters:
          - OperatorEmail
      -
        Label:
          default: Image ID
        Parameters:
          - EC2ImageID
      -
        Label:
          default: Launch Template Name
        Parameters:
          - WebServerLaunchTemplateName
      -
        Label:
          default: Instance Type
        Parameters:
          - InstanceType
      -
        Label:
          default: EC2 KeyPair
        Parameters:
          - EC2KeyName

# Parameters are used to to build flexible CloudFormation templates
Parameters:
  ExportVpcStackName:
    Description: The name of the VPC stack that exports values.
    Type: String

  ExportAlbStackName:
    Description: The name of the ALB stack that exports values.
    Type: String

  OperatorEmail:
    Description: A valid email address to notify if there are any scaling operations.
    Type: String

  EC2KeyName:
    Description: Name of your EC2 KeyPair to enable SSH access to the instance.
    Type: AWS::EC2::KeyPair::KeyName
    ConstraintDescription: Must be the name of an existing EC2 KeyPair.

  EC2ImageID:
    Description: The ID of the custom AMI.
    Type: String

  WebServerLaunchTemplateName:
    AllowedPattern: '[a-zA-Z0-9\(\)\.\-/_]+'
    ConstraintDescription: Must be unique to this account. Max 128 chars. No spaces or special characters like '&', '*', '@'.
    Default: Lamp-Server-Launch-Template
    Description: Name of launch template.
    Type: String

  InstanceType:
    Description: Webservers EC2 instance type.
    Type: String
    Default: t2.micro
    AllowedValues:
      - t1.micro
      - t2.nano
      - t2.micro
      - t2.small
    ConstraintDescription: Must be a valid EC2 instance type.
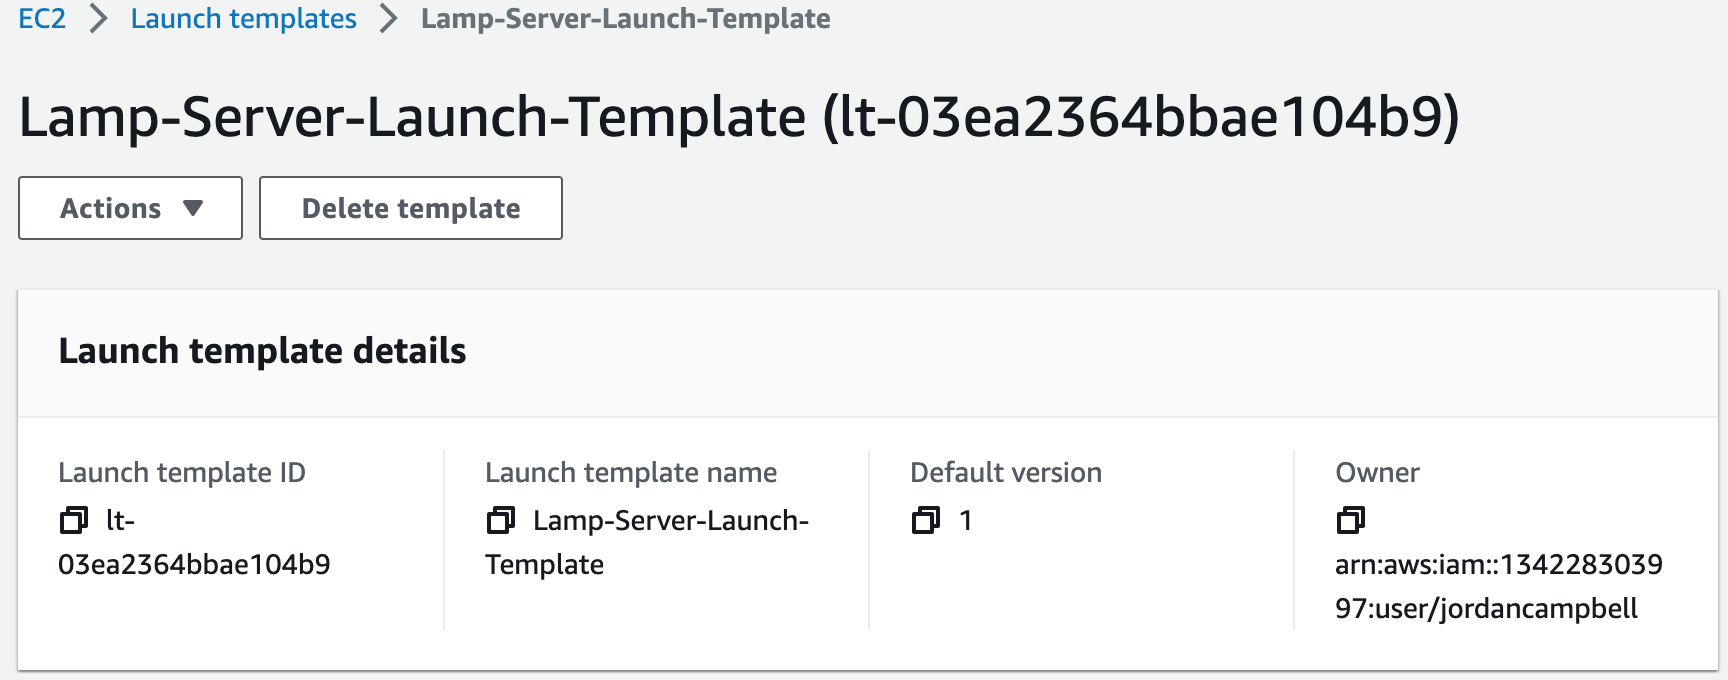
3. In this build, we created a launch template.
Resources:
# Create a launch template
  WebServerLaunchTemplate:
    Type: AWS::EC2::LaunchTemplate
    Properties:
      LaunchTemplateName: !Ref WebServerLaunchTemplateName
      LaunchTemplateData:
        ImageId: !Ref EC2ImageID
        InstanceType: !Ref InstanceType
        KeyName: !Ref EC2KeyName
        Monitoring:
          Enabled: true
        SecurityGroupIds:
          - Fn::ImportValue: !Sub ${ExportVpcStackName}-WebserverSecurityGroup
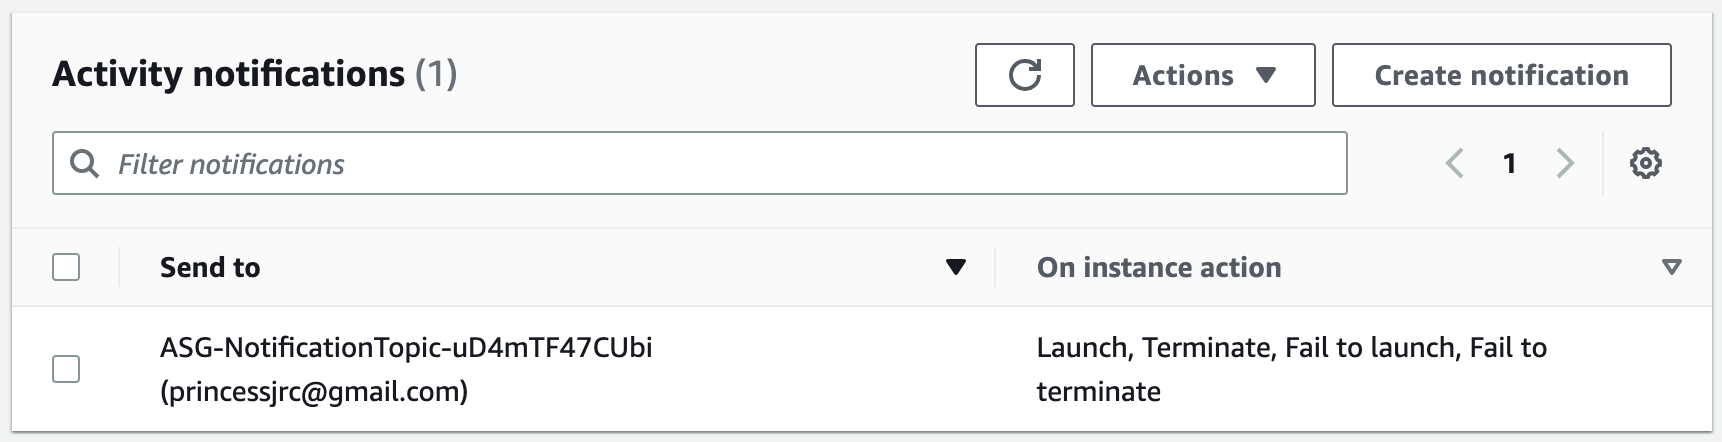
# Create a notification topic
  NotificationTopic:
    Type: AWS::SNS::Topic
    Properties:
      Subscription:
        - Endpoint: !Ref OperatorEmail
          Protocol: email
# Create an auto scaling group
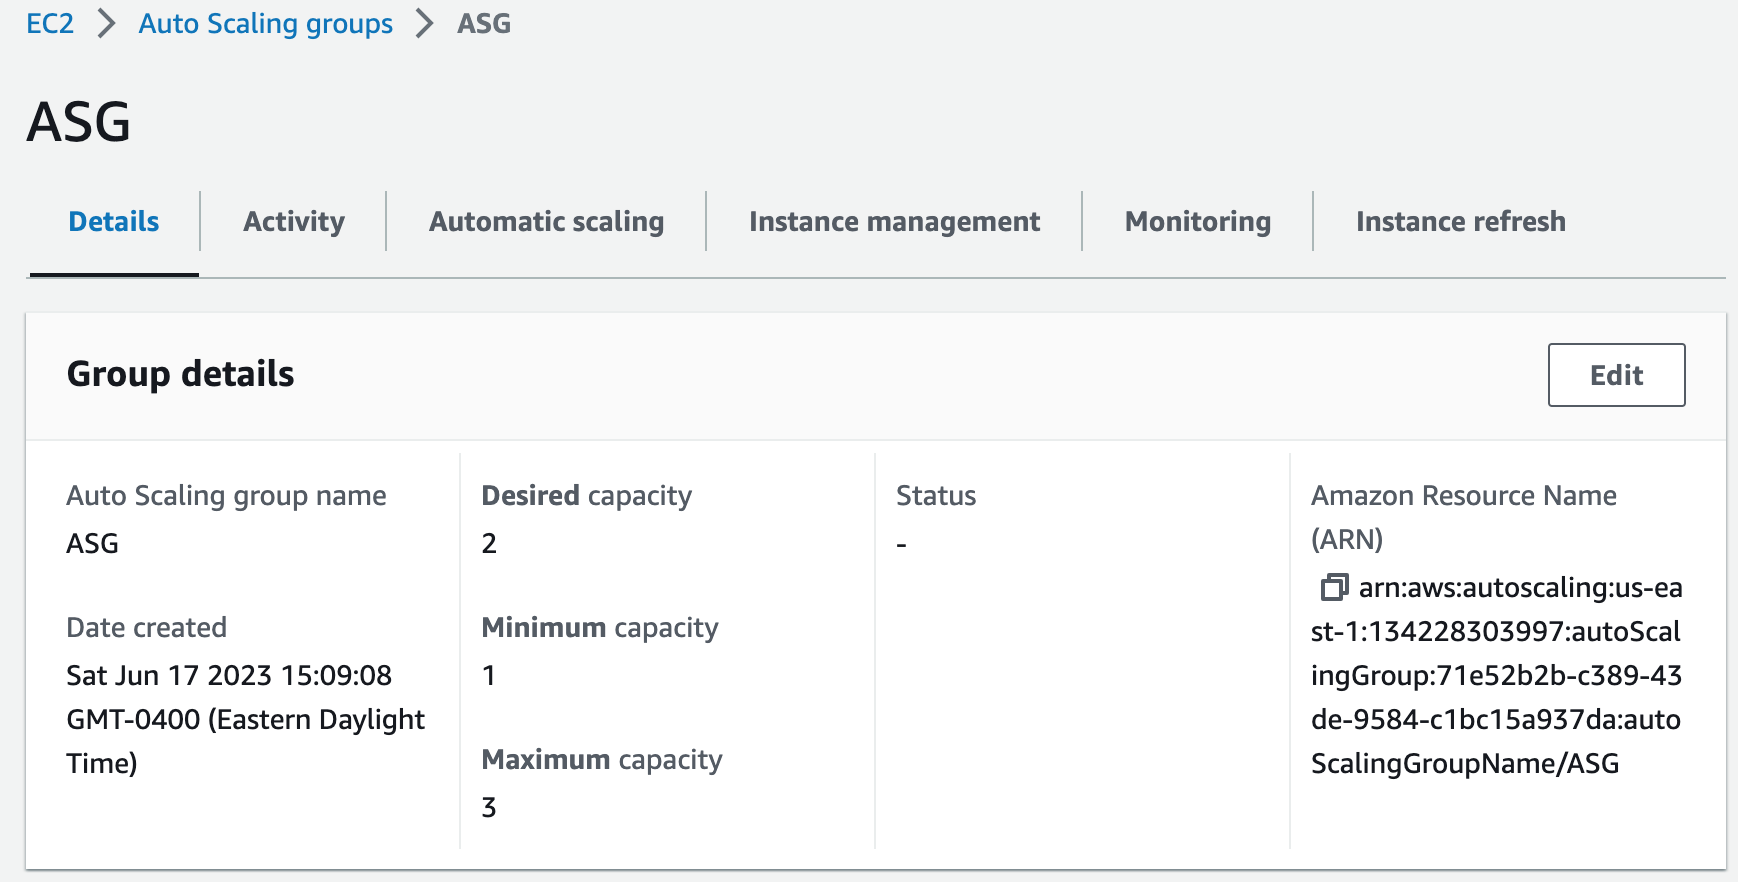
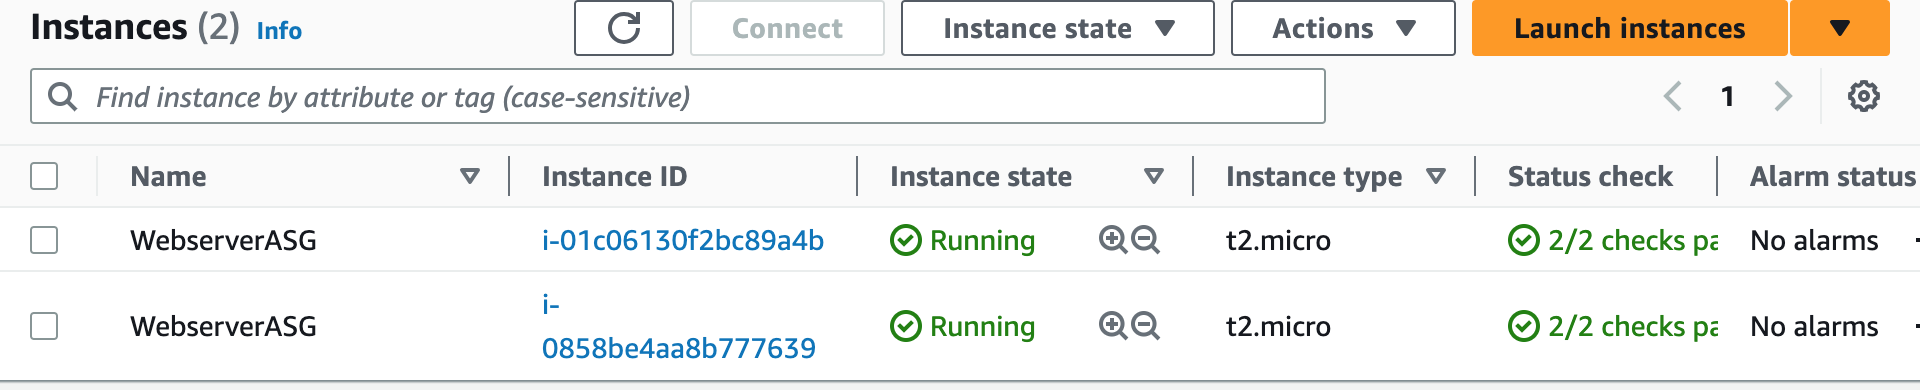
WebServerAutoScalingGroup:
Type: AWS::AutoScaling::AutoScalingGroup
Properties:
AutoScalingGroupName: ASG
VPCZoneIdentifier:
- Fn::ImportValue: !Sub ${ExportVpcStackName}-PrivateAppSubnet1
- Fn::ImportValue: !Sub ${ExportVpcStackName}-PrivateAppSubnet2
HealthCheckGracePeriod: 300
HealthCheckType: ELB
LaunchTemplate:
LaunchTemplateName: !Ref WebServerLaunchTemplateName
Version: !GetAtt WebServerLaunchTemplate.LatestVersionNumber
MinSize: 1
MaxSize: 3
DesiredCapacity: 2
Tags:
- Key: Name
Value: WebserverASG
PropagateAtLaunch: true
TargetGroupARNs:
- Fn::ImportValue: !Sub ${ExportAlbStackName}-ALBTargetGroup
NotificationConfiguration:
TopicARN: !Ref NotificationTopic
NotificationTypes:
- 'autoscaling:EC2_INSTANCE_LAUNCH'
- 'autoscaling:EC2_INSTANCE_LAUNCH_ERROR'
- 'autoscaling:EC2_INSTANCE_TERMINATE'
- 'autoscaling:EC2_INSTANCE_TERMINATE_ERROR'
WebServerScaleUpPolicy:
Type: AWS::AutoScaling::ScalingPolicy
Properties:
AdjustmentType: ChangeInCapacity
AutoScalingGroupName: !Ref WebServerAutoScalingGroup
Cooldown: 60
ScalingAdjustment: 1
WebServerScaleDownPolicy:
Type: 'AWS::AutoScaling::ScalingPolicy'
Properties:
AdjustmentType: ChangeInCapacity
AutoScalingGroupName: !Ref WebServerAutoScalingGroup
Cooldown: 60
ScalingAdjustment: -1
CPUAlarmHigh:
Type: AWS::CloudWatch::Alarm
Properties:
AlarmDescription: Scale-up if CPU > 90% for 10 minutes.
MetricName: CPUUtilization
Namespace: AWS/EC2
Statistic: Average
Period: 300
EvaluationPeriods: 2
Threshold: 90
AlarmActions:
- !Ref WebServerScaleUpPolicy
Dimensions:
- Name: AutoScalingGroupName
Value: !Ref WebServerAutoScalingGroup
ComparisonOperator: GreaterThanThreshold
CPUAlarmLow:
Type: AWS::CloudWatch::Alarm
Properties:
AlarmDescription: Scale-down if CPU < 70% for 10 minutes.
MetricName: CPUUtilization
Namespace: AWS/EC2
Statistic: Average
Period: 300
EvaluationPeriods: 2
Threshold: 70
AlarmActions:
- !Ref WebServerScaleDownPolicy
Dimensions:
- Name: AutoScalingGroupName
Value: !Ref WebServerAutoScalingGroup
ComparisonOperator: LessThanThreshold
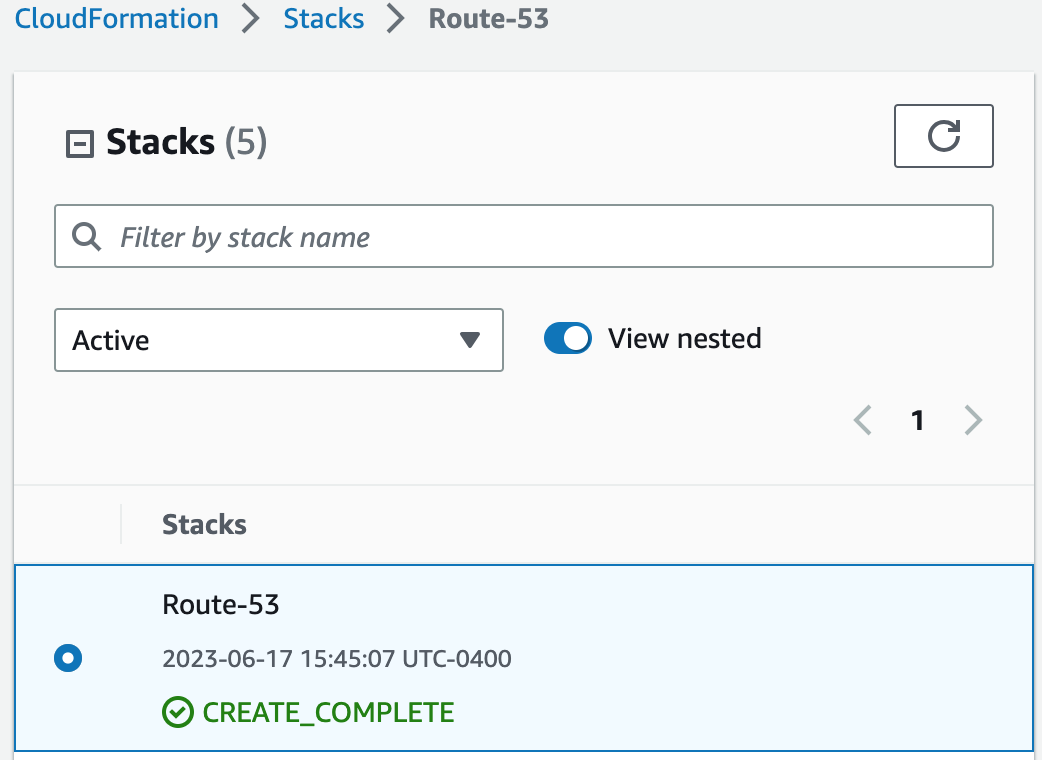
Step 6: Create an Record Set in Route 53
In this step, we will use CloudFormation to build a record set in Route 53.Route 53 Template
1. We are going to create another stack (With new resources (standard)).
- AWSTemplateFormatVersion
- Description
- Metadata
- Parameters
AWSTemplateFormatVersion: 2010-09-09

Description: This template creates a record in Route 53.

# The following metadata is used to group the parameters
Metadata:
  AWS::CloudFormation::Interface:
    ParameterGroups:
      -
        Label:
          default: Export ALB Stack Name
        Parameters:
          - ExportAlbStackName
      -
        Label:
          default: Domain Name
        Parameters:
          - DomainName

# Parameters are used to to build flexible CloudFormation templates
Parameters:
  ExportAlbStackName:
    Description: The name of the ALB stack that exports values.
    Type: String

  DomainName:
    Description: The main domain name of the site (e.g. example.com).
    Type: String
    Default: jrcworks.com
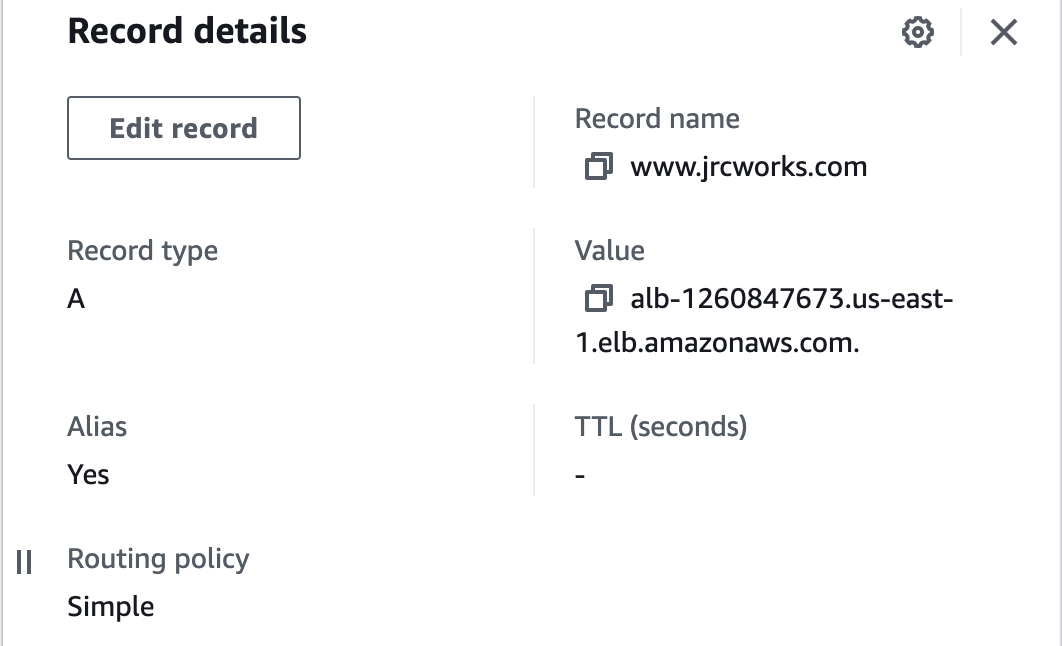
3. In this step, we created a record set for our domain.
Resources:
# Create record set
  SiteDomainName:
    Type: AWS::Route53::RecordSetGroup
    Properties:
      HostedZoneName: !Join ['', [!Ref DomainName, '.']]
      RecordSets:
      - Name: !Join
        - ''
        - - 'www.'
          - !Ref DomainName
        Type: A
        AliasTarget:
          HostedZoneId:
            Fn::ImportValue: !Sub ${ExportAlbStackName}-ApplicationLoadBalancerZoneID
          DNSName:
            Fn::ImportValue: !Sub ${ExportAlbStackName}-ApplicationLoadBalancerDnsName
# Create outputs to export some information about our VPC so we can reference the information in another CloudFormation template.
Outputs:
  WebsiteURL:
    Value: !Join
      - ''
      - - 'https://www.'
        - 'jrcworks.com'
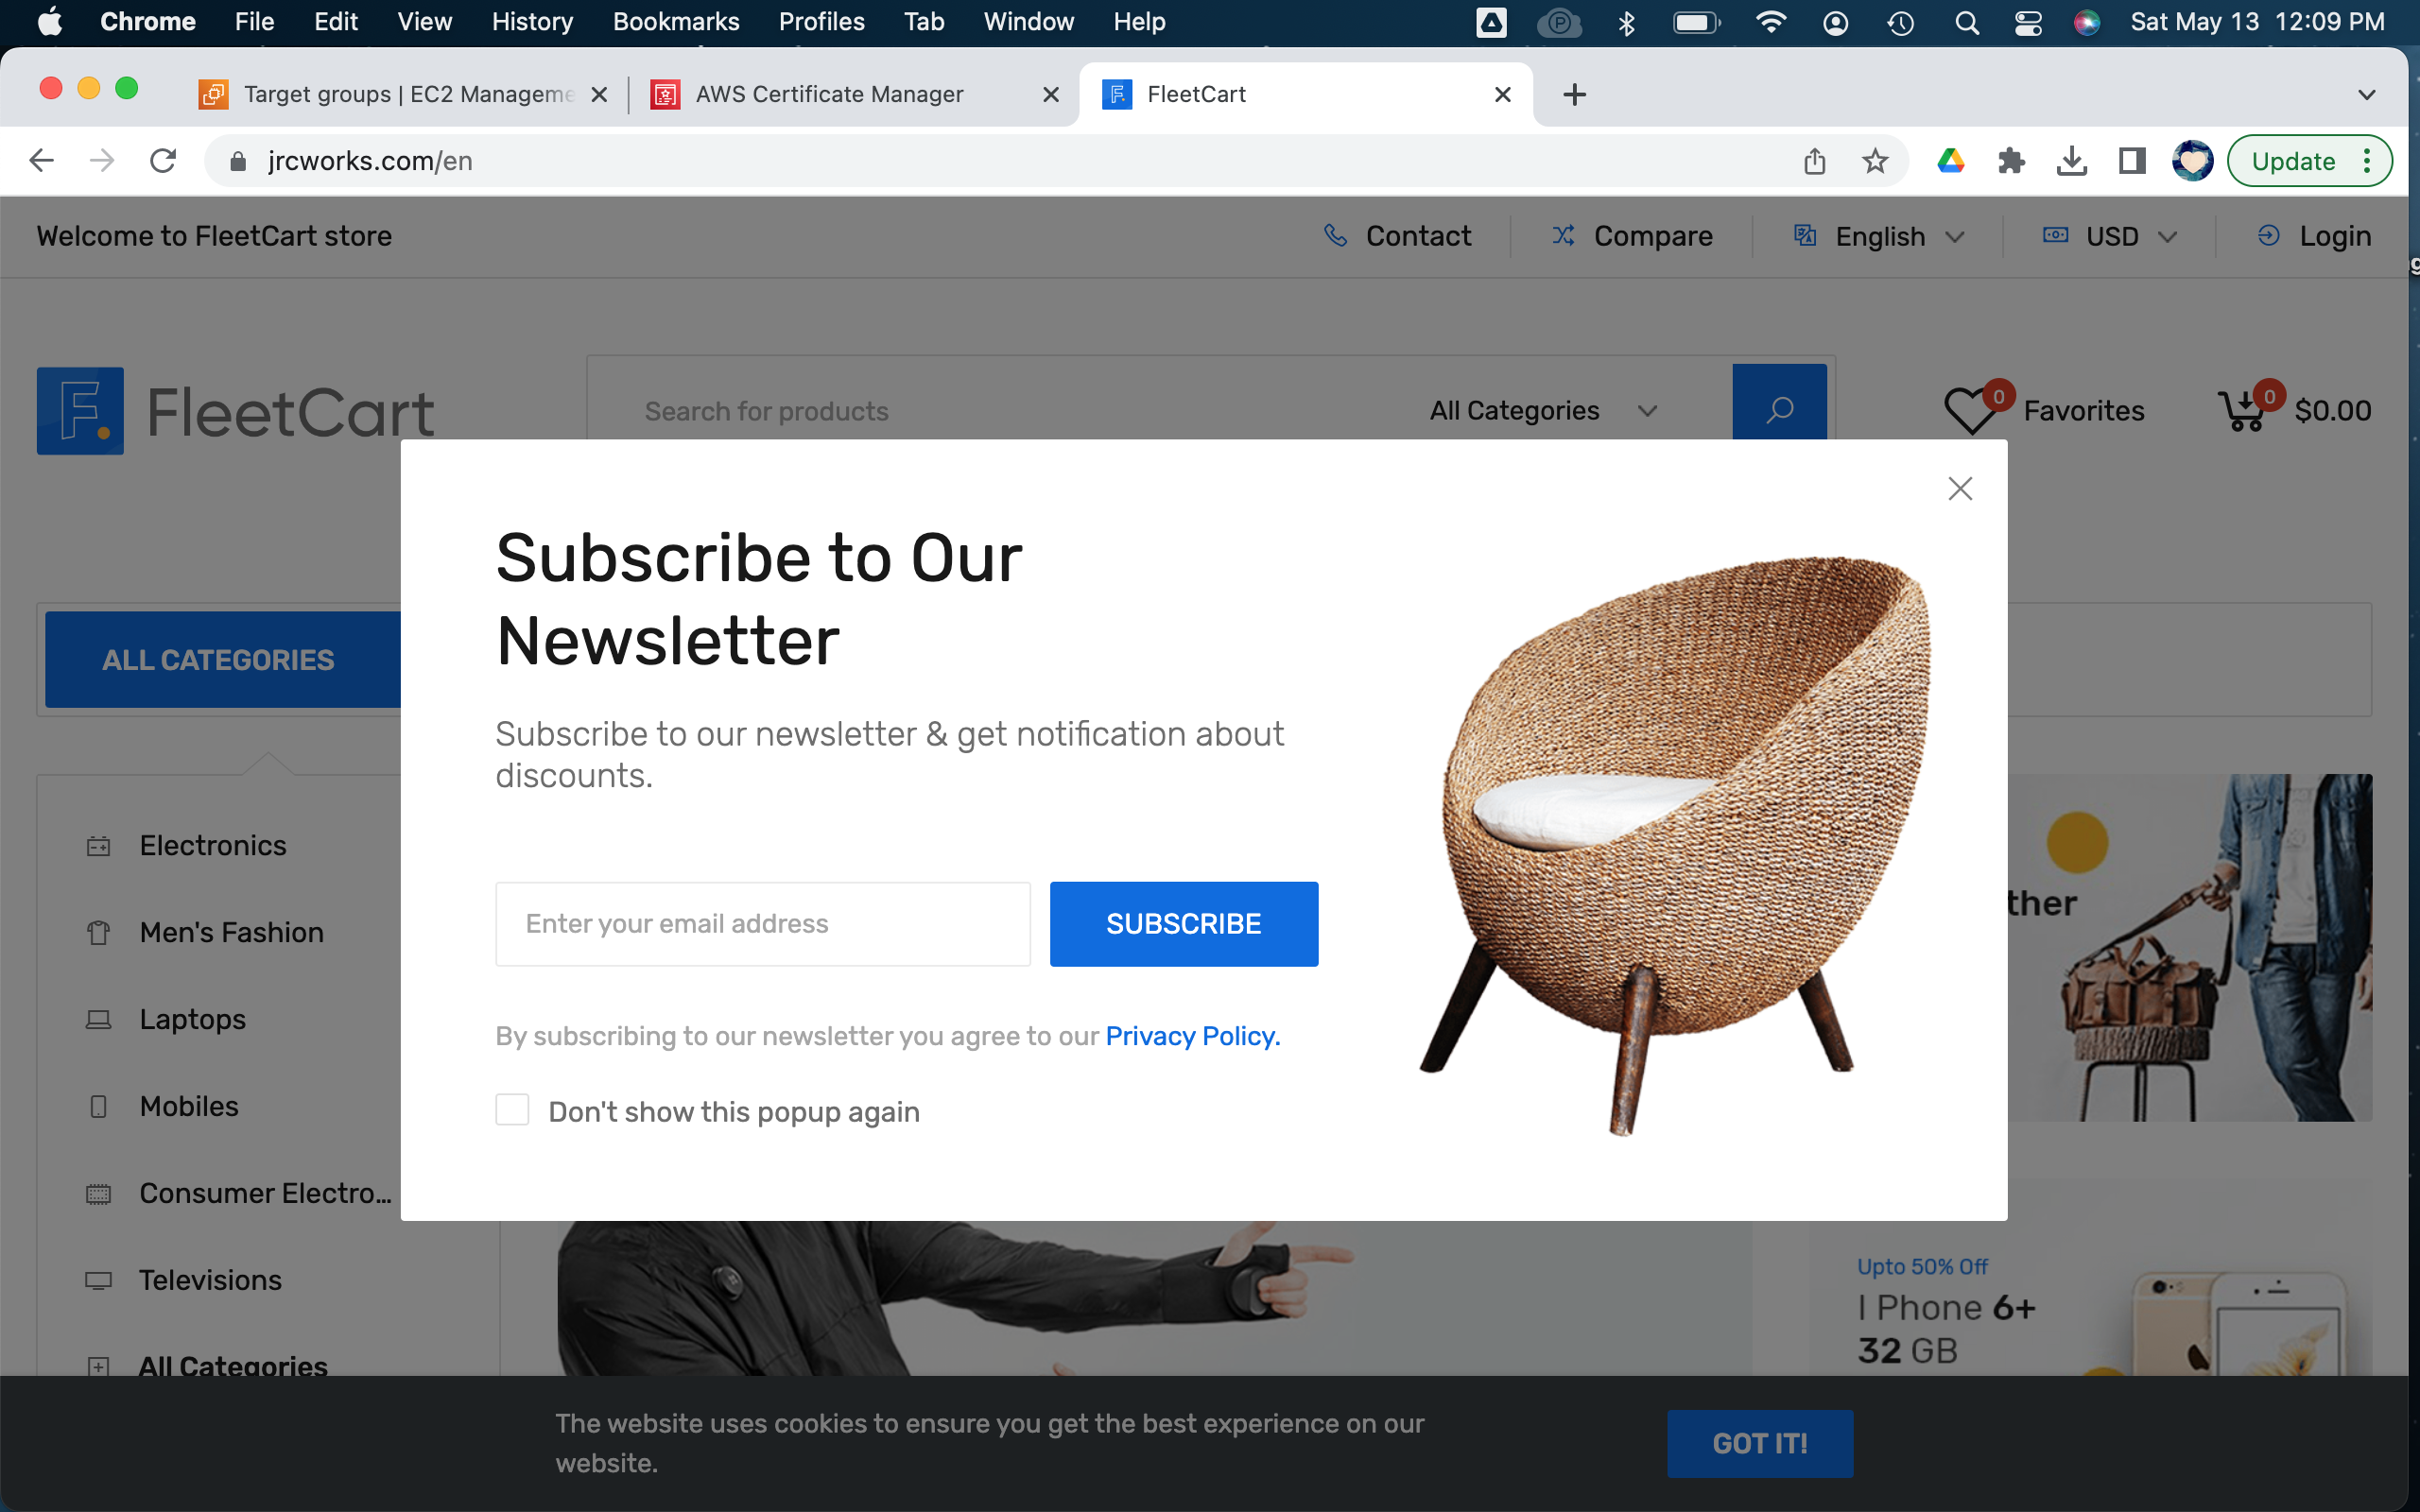
Our web app is now accessible.